 Scoot F.A.Q.
Q. How do I tune the carburetor?
Please read through this entire section and any other links or documents necessary to be comfortable with the idea of tuning before you start fiddling with any part of the carburetor. Your experience is more likely to go smoothly if you make yourself aware of the entire process beforehand. To speed up the search for specific information, below are links directly to each section of this page.
Pre-Tuning
Before you start swapping jets and adjusting screws you should make sure that your carburetor and fuel system are clean, the fuel in your tank is fresh, the air filter or air box is attached and in good condition, vacuum and fuel hoses are properly connected and not damaged or cracking, and that the engine and CVT are otherwise in good working order. Carburetor tuning will be frustrating and pointless if there are other problems that need to be addressed first. CLICK HERE for help with carb cleaning.
Float Height
Even if you don't have any obvious problems, float height should be checked before the rest of the tuning process. If the float height is not properly set it can cause fuel delivery issues throughout the throttle range from idle to WOT. The float is in the bottom of the carburetor so the carburetor will need to be removed in order to check it.
Carburetor removal that will apply to many four-stroke scooters is shown HERE. That link also shows how to deal with a sealed carburetor that is common on scooters in recent years. I did leave out removing the fuel hose in that video, because it was part of a PDI video series and the fuel hose was mentioned in another video, but the fuel hose must be removed. You can see a typical two-stroke carb being removed HERE and THIS VIDEO shows how to remove the cap and cable from that style of carburetor. The process will be similar for most scooters. You will need to drain the bowl, disconnect the fuel hose, throttle cable, vacuum hoses if equipped, unhook the choke or enricher/bystarter, disconnect the oil injection hose if equipped (2T), and remove the carburetor from the air box or filter and the intake.
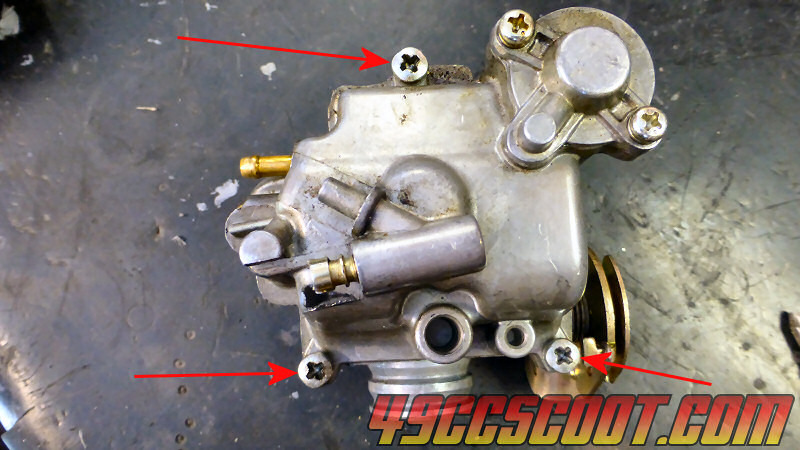
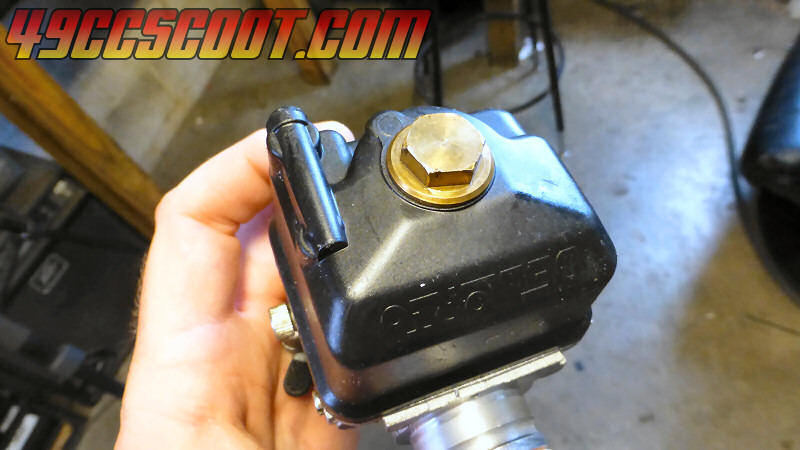
Once the carburetor is removed and the fuel has been drained, you can remove the float bowl by removing the screws that hold it in place. There are usually three or four screws around the perimeter of the bowl, though some aftermarket carbs use a large central plug/screw that keeps the bowl in place. Pictures HERE show the float bowl being removed as well as videos HERE (2T) and HERE (Sealed 4T).
Float bowl screws. |
Central bowl retaining plug. |
|
 |
 |
 |
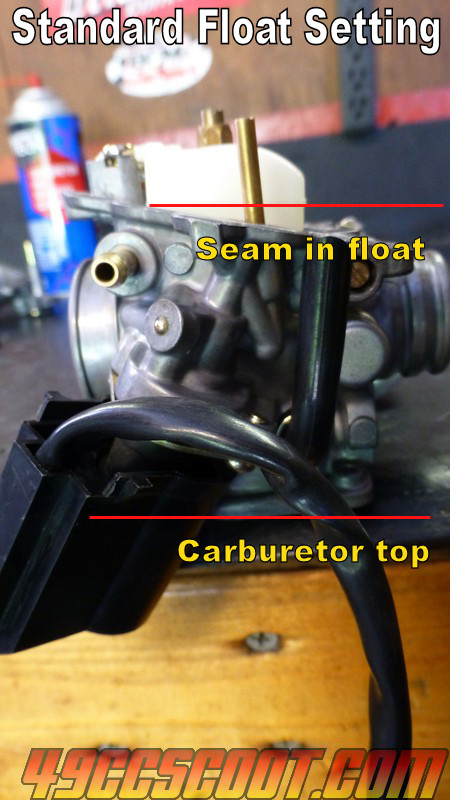
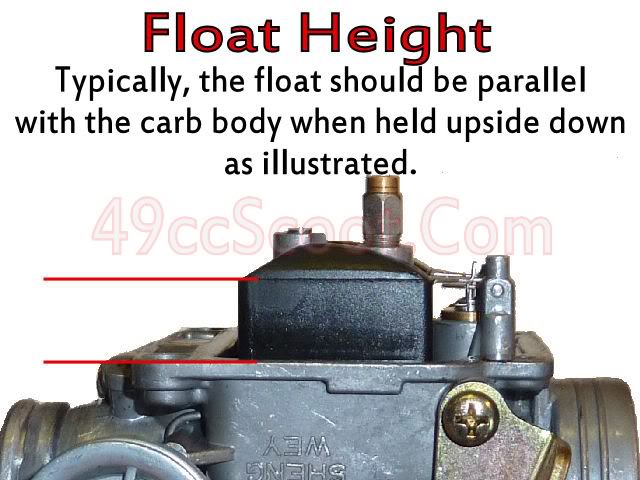
Once the float bowl has been taken off you should be able to see the float, which is usually a large foam or hollow plastic piece that takes up the majority of the bowl. Sit the carburetor upside down, so the float is facing up and the top of the body is on a flat surface. Standard float height usually allows the float to sit parallel with the top of the carburetor, or I suppose you could say perpendicular to the body of the carb. It's easiest to see this if you look at the seams on the float. You may also be able to find specifications for float height in a service manual or documentation for your scooter or the specific carburetor. Generally a level/parallel float setting is the standard and works well. Raising the float height, which looks like lowering it when you have the carburetor upside down, will allow more fuel into the bowl which can cause the scooter to run richer or even cause flooding and fuel overflow. Lowering the float height, which looks like raising it when the carb is upside down, lowers the fuel level in the bowl and can cause the carburetor to pickup less fuel and run leaner or if it's too low it may not allow fuel into the bowl at all. I don't suggest straying from recommended settings in most cases, but it's a good idea to at least understand the effects of altered float height.
139QMB Carb Float Height |
Minarelli Carb Float Height |
GY6 150 Carb Float Height |
 |
 |
 |
If you need to adjust the float height there is often a metal tab/tang on the float assembly that the float needle hangs from. Bending that tab will allow you to change the float height. Take small steps, being gentle with the tab, until you reach the desired float height. Some floats are solid plastic and not easily adjustable. If you must adjust the float height and have a plastic tab, first see if you can change the height by bending the hangar on the float needle in a different manner to change the float height. If not, you may be able to heat the plastic tab enough that it can be bent to change float height. Do not use an open flame, but instead something like a hair dryer or heat gun. You must be very careful because plastic floats can easily be melted and ruined. Because of the difficulty of their adjustment, consider leaving well enough alone if a float of this design is near a correct setting or known to be functional.
You can see more about the float adjustment process on video HERE (2T) and HERE (4T).
Throttle Position
Different components of a carburetor control the mixture at different throttle positions, so we need to remain aware of how far the throttle is open while tuning. Understanding that carburetor issues should be narrowed down by the throttle position at which they occur will help you improve both tuning and troubleshooting carburetors. For basic tuning I use a simplified approach that first looks to the idle mixture setting and pilot jet for idle up to around 1/4 throttle. Roughly 1/4 to 3/4 throttle are primarily controlled by the needle and it's position. The main jet is the major player from about 3/4 throttle to wide open throttle (WOT).
Simplified Carb Components |
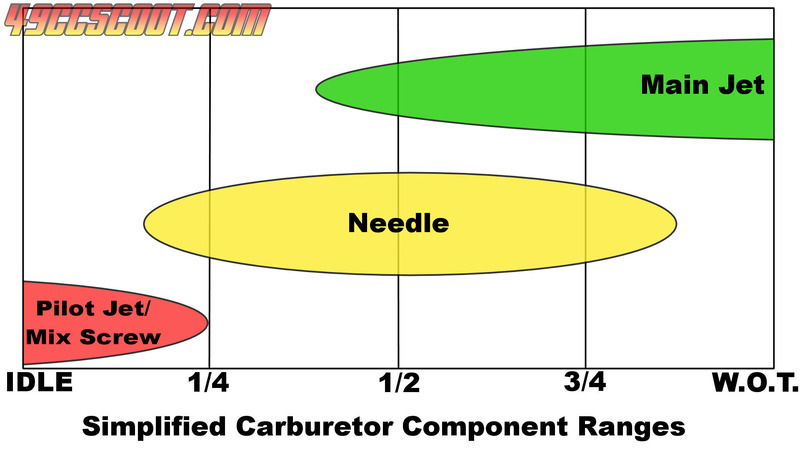 |
The truth is that there are more parts in the carburetor that play a role in the mixture at various times. For example, the throttle valve (slide) cutaway has an impact on mixture up to around 1/2 throttle, but many people never find the need to change one in order to achieve a working tune. In addition, some parts can be hard to come by when dealing with certain carburetors so finding replacements or alternatives for even more basic parts can be tricky enough. Some components also have an effect on air/fuel ratio over a much wider range than stated above. One example is the idle circuit, the mixture screw and pilot/idle jet, which has some minor influence on mixture all the way through to WOT. I don't choose to show this in my simplified explanation because the effect of the idle circuit on high throttle openings is pretty insignificant and you should not change idle settings to correct high throttle opening issues. Another example is the main jet. It has an effect all the way throughout the throttle opening, to the point that if your main jet is way off the scooter may not even start. That said, it's not wise to swap out a main jet because the scooter idles poorly if it runs well otherwise. For those reasons, I feel that the simplified approach will serve the average person well. If you find that you cannot accomplish the state of tune you're after with this method, by all means ask for further assistance on the forum and if possible seek out a tuning manual for your specific carburetor.
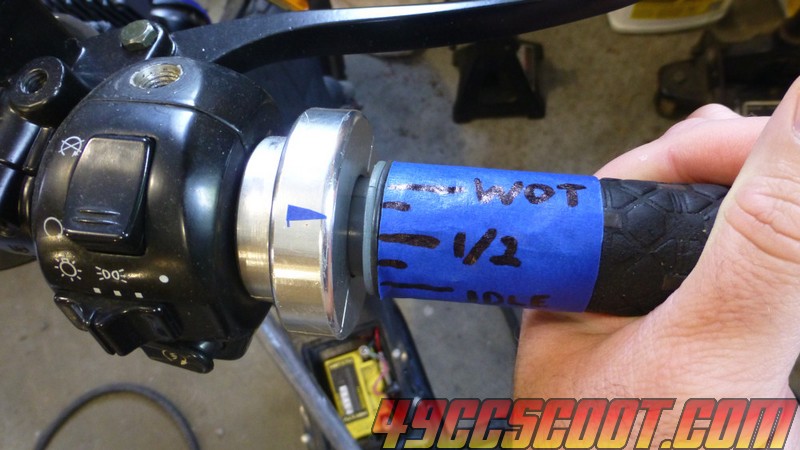
Knowing what works where will do you little good if you have no idea how far the throttle is opened while tuning, but marking the throttle is easy. The quickest way is to take a small piece of masking tape and cut it to form a pointer or a thin line. Painter's tape usually holds well enough and is less likely to leave residue behind when removed. Place it on the throttle housing so that it points toward the throttle grip. Then wrap a piece of masking tape all the way around the throttle grip. Use a marker to draw a line that matches up with where your pointer is with the throttle closed. That will be your idle mark. Then open the throttle all the way and make a mark on the tape that corresponds with the pointer now. That will be your WOT mark. Make another line centered between the idle and WOT mark to indicate 1/2 throttle. Then split each of the remaining sides of 1/2 throttle again to make 1/4 and 3/4 throttle opening marks. Now you'll be able to tell how much throttle you're using with just a glance and no guesswork.
You can also mark the throttle by first putting a pointer of some sort on the throttle grip and then making marks on the housing for the different openings if you'd prefer. Some choose a more permanent solution like scribing lines or using whiteout or paint markers on the housing and grip. Tape works just fine though.
Throttle marked with tape. |
 |
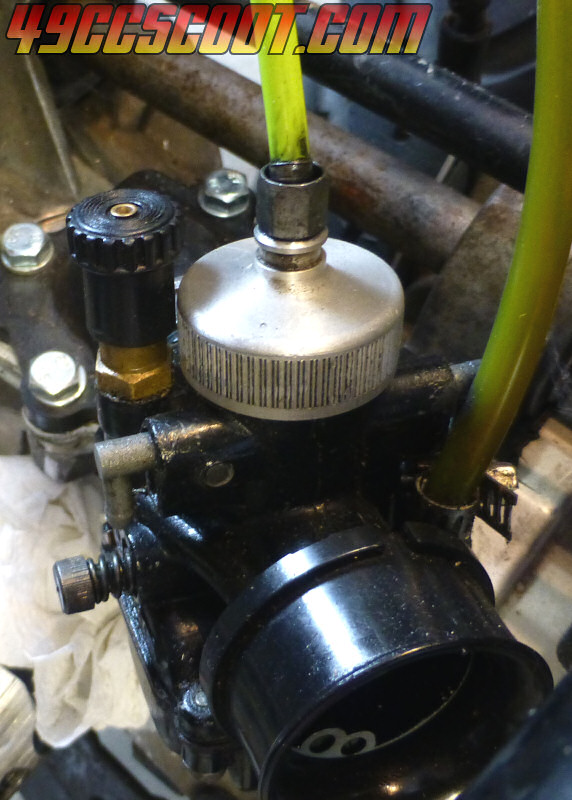
Quick Idle Setting
People prefer different orders of operation while setting up a carburetor. Some like to focus on the main jet first and work their way through components finishing at the idle settings. Some dial in the idle and pilot jet first and work their way up to the main jet and WOT tuning. I prefer to begin my real tuning focus on the main jet and getting 3/4 to WOT right, but before that I do like to briefly give attention to the idle settings. I do a thorough idle adjustment process later, but for now I just want to make sure the engine can idle without dying or running at high RPM so it's easier to warm up and ride for later test runs.
139QMB Idle Speed Screw |
GY6 125-150 Idle Speed |
Minarelli Idle Speed Screw |
DellOrto PHBG Idle Speed |
 |
 |
 |
 |
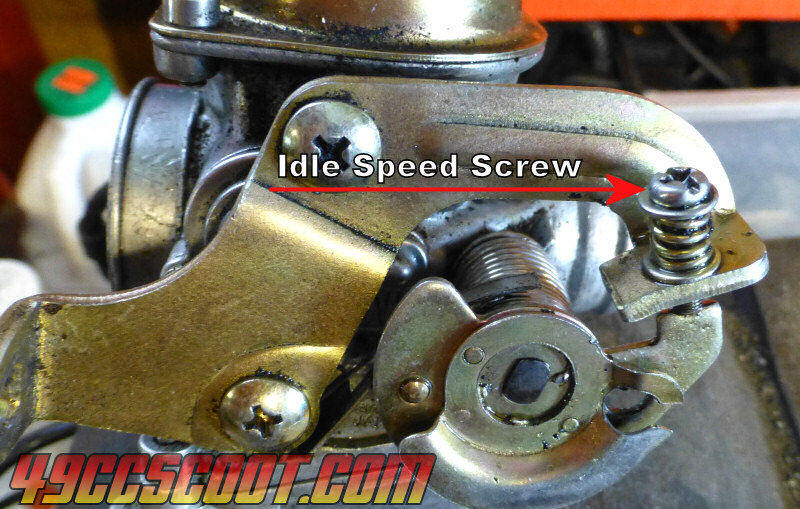
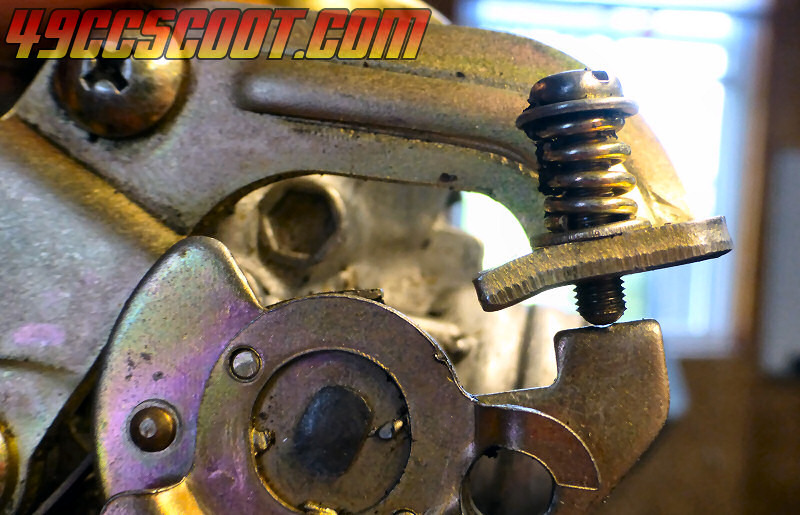
If using a new or different carburetor, I like to do a preliminary setting of the idle speed screw before the carburetor is ever installed on the scooter. This setting may be too low, but I'd rather start the engine and have to turn the speed up more if it idles low or stalls than to start the engine and have it rev very high. A high idle setting could be dangerous on any bike without a center stand that keeps the rear wheel off of the ground. For CV carbs, unscrew the idle speed screw until it just stops making contact with the throttle lever. Then screw it back in 1 to 1 1/2 turns. For slide carbs, unscrew the throttle speed screw until the slide (throttle valve) is all the way closed. Then screw it in 1 to 1 1/2 turns.
CV Carb's Idle Speed Screw Screwed Out For No Contact |
Slide Carb's Throttle Closed |
Slide Carb's Throttle 1 1/2 Turns Open |
 |
 |
 |
Start the engine and adjust the idle speed screw so the engine will run on it's own without you holding the throttle. Don't set it so high that the rear wheel is turning quickly. If you have a tachometer, 1,500-2,000RPM is generally a good speed. Allow the engine to warm up and then re-check the speed and re-adjust if necessary.
If you cannot get the engine to idle well enough using the idle speed adjustment only, you may need to adjust the mixture screw as well. Scroll down to the more thorough idle setting information. There's no harm in adjusting the mixture screw now even if you don't have to, but it may need to be adjusted again later anyway. Keep the idle adjusted as described as necessary while you move on through the tuning process.
Main Jet Info And Starting Point
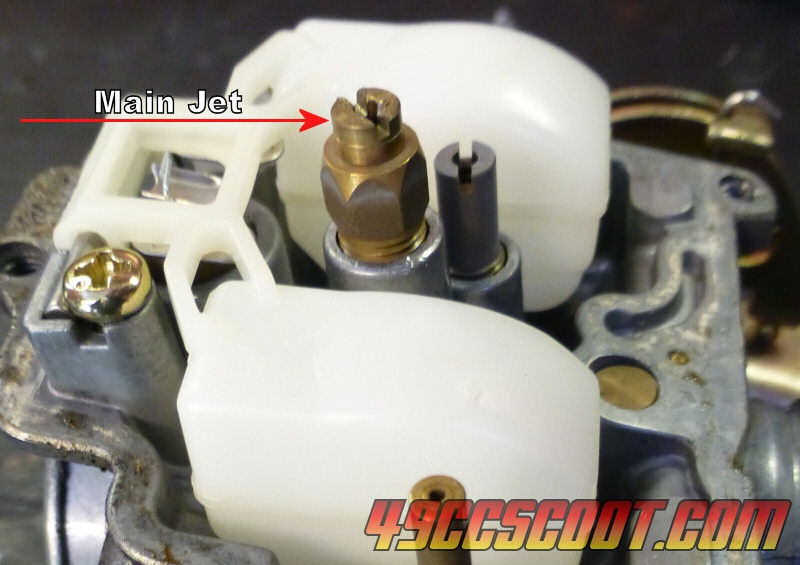
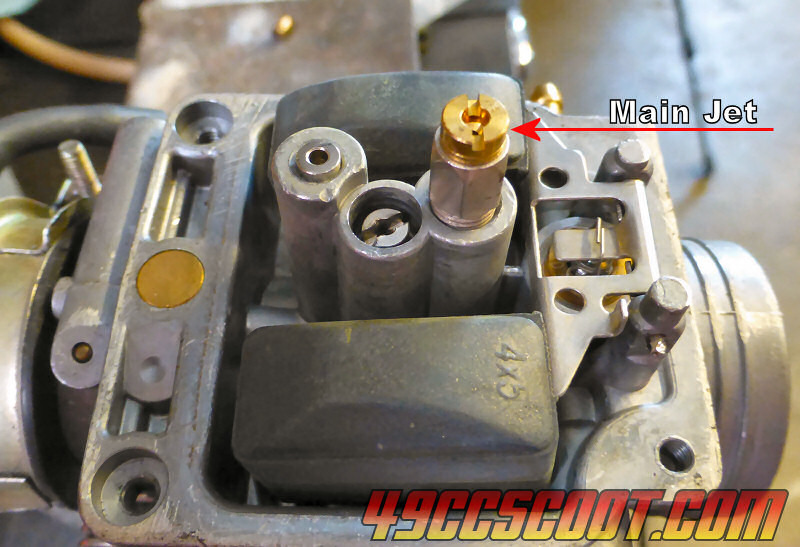
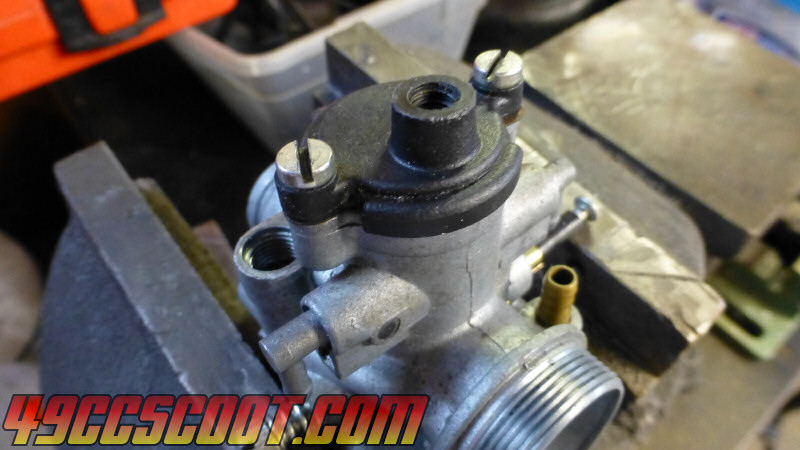
Once the carburetor is known to be clean with a proper float height setting and able to idle, I begin trying to find the proper main jet. If you've checked the float or cleaned the carburetor you've already seen the main jet. It's usually near the center when you're looking at the carburetor with the float bowl removed.
Common Stock 1E40QMB Carb |
139QMB Stock Carburetor |
GY6 125-150 Stock Carb |
DellOrto PHBG |
 |
 |
 |
 |
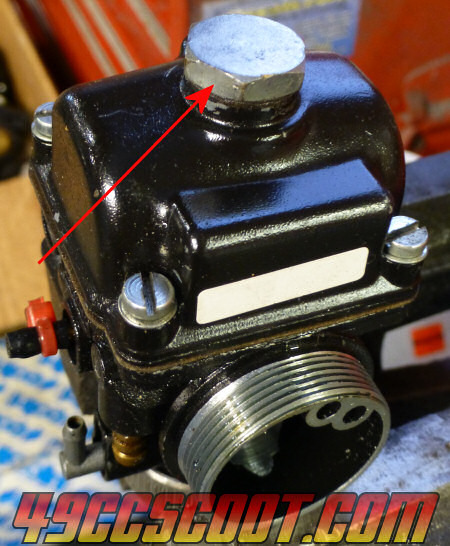
Some carburetors (usually aftermarket) even have a plug in the center of the float bowl that provides easy access to the main jet without having to remove the bowl. On models where the carburetor is mounted with nothing directly below it, this can make the tuning process much quicker and easier.
DellOrto PHBG Black Edition w/Center Plug |
PHBG w/Center Plug Removed For Jet Access |
 |
 |
The main jet is removed or installed using a flat screwdriver in most cases, though some can be removed with hex sockets. There is no adjustment via screwing the main jet in or out. It must be screwed in securely every time, but be careful not to overtighten it. You can see the main jet being removed and installed HERE (1E40QMB) and HERE (139QMB). Remember to use a clean container to catch the fuel each time you drain the bowl, and then it can poured back into the tank.
Main jets come in different thread diameters and pitches, lengths, head designs and more and you must be certain to use jets that are a proper fit. Luckily this is pretty simple with the most common carburetors. Below is a bit a jet info and if your carburetor is not listed a quick search or asking on the forum should get you the info you need.
Carburetor Type |
Main Jet Style |
1E40QMB / Minarelli Stock Mikuni VM or Clone |
Mikuni VM11/22 |
139QMB Stock CV/CVK |
Keihin 99101-116 a.k.a. Keihin 5mm Round |
GY6 125-150 Stock CV/CVK |
Keihin 99101-393 a.k.a. Keihin 6mm Round |
Dellorto PHBG or Clone |
5mm Dellorto |
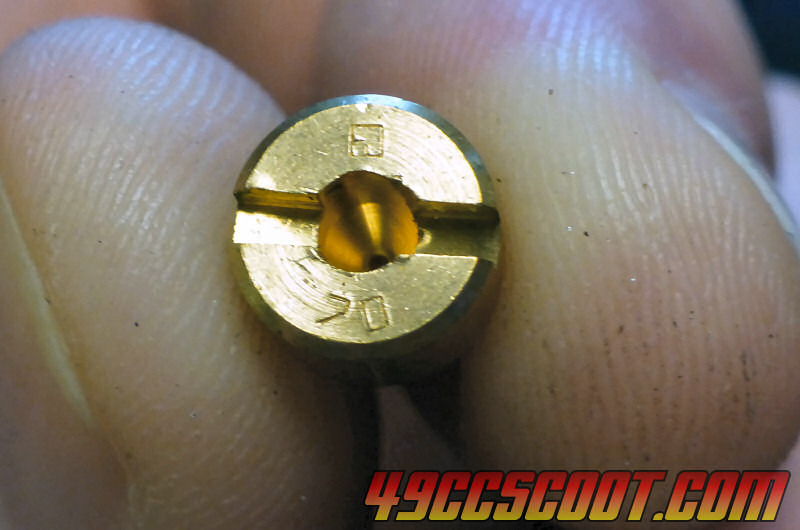
Main jets are labeled with numbers in most cases stating their orifice size or flow rating. Different manufacturers use different rating systems so it's easiest to stick with main jets meant for your carburetor. For example, if you have a Mikuni or Mikuni clone carburetor try to use Mikuni style main jets so they'll be rated the same way. If you do decide to use Keihin main jets in a Mikuni carburetor or some other combination, HERE is some size conversion information and more can be found with your favorite search engine.
70 Main Jet |
90 Main Jet |
 |
 |
Main jets can be drilled or reamed, but it is much easier to buy a selection of main jets for testing and tuning purposes. Having an assortment of jets on hand allows for much quicker swapping and speeds up the entire tuning process. You should be able to find main jet kits containing multiple jets for most popular applications. Parts For Scooters carries main jet kits and individual main jets for 139QMB (kit # 114-49, individual # 114-36), GY6 125-150 (kit # 114-48, individual # 114-35), and Minarelli (kit # 114-50, individual # 114-60). You can also find jets from sites such as JetsRUs, Treatland, Rocky Mountain ATV, eBay, amazon, Ali Express, and others. Jets are often sold in increments of 5 (75, 80, 85, 90), and that works well enough to get into a good state of tune in most cases. You could purchase a jet kit in 5 number increments, and then buy a jet between the two best performing jets that you have on hand later to see if you can squeeze a little more out of the tune. For example, if 75 and 80 jets work well, you could try a 77-78 and maybe even an 82.
Once you've got your main jets on hand and you're ready to tune, you'll need to decide which main jet to use as a starting point. If the scooter has been running alright and your goal is to do some fine tuning, the easy way to start is to use the jet that's been in use and working for you. Otherwise, you have to make your best educated guess at an appropriate jet size and then use a larger one to err on the side of rich. It's always safer to begin with a larger jet that may be rich because rich conditions will cause the engine to run cooler, while lean conditions can cause the engine to run hot. In the case of two-strokes, lean conditions will commonly cause soft-seizing which could lead to scarring of the cylinder, piston, and ring damage. The piston crown could even begin to melt if it overheats, forming a concave crown or even a hole in the crown. It's much quicker to go through a few exceedingly rich jets than to repair a damaged engine... and much less costly.
One of the most common ways is to find out what main jet others are using with similar setups and base your jetting starting point around those numbers. You must remember that even small differences in the setup, especially air filter choice, can make a difference in the jetting needed. Free flowing filters, like UNI or K&N pod filters, will require larger jetting than stock or performance oriented airboxes. Riders at high elevations and warmer climates will need smaller main jets than those near sea level and in cold climates. Once you figure out what jetting range is most likely to work for you, start at least 5 numbers larger.
There is another way that some use to find a jetting starting point using simple math. It's been around in carburetor tuning books and manuals for decades and mentioned on sites and forums for years. The concept is to multiply the carburetor's venturi size by some constant to end up with a rough estimate of a main jet that will work at least as a starting point for tuning. Some claim the formula to work as much more than a rough estimate, but in practice I've seen too many similar setups using different jetting to call it more than a guess.
Here's a look at the basic formula :
Main Jet Size = Carburetor Venturi Size In mm x Constant
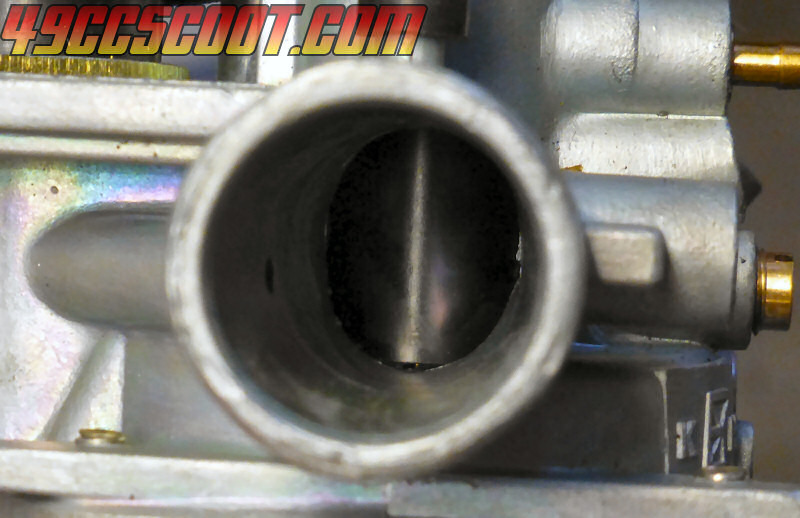
The carburetor venturi is the smallest part of your carburetor's bore, which is difficult to measure and is stated in a number that reflects the diameter of a circle that matches the area of the venturi since many venturis are oval shaped rather than round. If your carburetor has a stated size, such as 19mm or 17.5mm, use that as the venturi size.
The constant is a number used because it is known or suggested to provide a desired result. In the case of this formula, the constant is most commonly slightly below 4 and up to 5. Some are specific to a tenth or more, such as 4.2. For scooters and motorcycles 5 is usually the number of choice. Let's look at an example using 4 and 5. For this example let's say that a scooter is using a 19mm carburetor.
Main Jet Size = 19 x 4 |
Main Jet Size = 19 x 5 |
|
Main Jet Size = 76 |
Main Jet Size = 95 |
Those seem like reasonable numbers based on experience with multiple setups using 19mm carburetors on two-strokes and four-strokes, but I've seen 19mm carburetors using that entire range of jetting and a bit beyond. There are way too many variables to come up with a very solid number that works for all scooters as anything more than a rough starting point in my opinion. My suggestion if you opt to use this method would be to choose 5 as the constant, and then start out at least 5 numbers larger. As I said earlier, and will likely say repeatedly throughout this text, it's always safer to err toward rich.
Main Jet Selection Process
Once you've decided which main jet you want to start with and have installed it, the main jet tuning process can finally get underway. There are quite a few approaches to selecting the best main jet, and many of them work quite well. Here are a few :
- Trial and error tuning for power is my preferred method, and it's the one that I'll be covering in this article in more detail. Trial and error tuning is what it sounds like. You'll be trying a selection of jets in order to find out which ones work well and which ones don't. Recording information from each test should allow a pattern to emerge, pointing you toward a suitable jet for your application. Most forms of tuning involve at least some degree of trial and error.
- Spark plug reading is another popular tuning technique. It generally involves using a new spark plug with each main jet, so it can get a little expensive. A WOT pass is made and the engine is shut off after WOT. For our CVT driven scooters, you usually have to brake and slow down quickly, being careful and mindful of your surroundings, so the clutch disengages and the engine will no longer be rotated by the CVT. Then the spark plug is examined to determine if the mixture is correct or not. Sometimes the plug is chopped up so the whole porcelain section is visible. Sometimes tuners examine the plug with a magnifying glass and light or a specialty plug viewer. Knowing exactly what you want to see can be tricky, and improper spark plug heat ranges can throw off results. I feel that spark plug reading is best left to experienced tuners or used in addition to other methods. In it's most basic form, tuners simply check for wet, dry, dark, or light spark plugs to point them in the right direction if other symptoms aren't giving them a clear indication of the direction they need to go with jet size. If you'd like to learn more about reading spark plugs I have some information HERE and you can find a lot more information using your favorite search engine.
- Tuning using a wideband to monitor air/fuel ratio is the easiest, but also the most expensive unless you happen to have one lying around and are able to weld a bung into your exhaust for the O2 sensor. You can quickly see what the air/fuel ratio is and narrow down your jetting choices. Even using a wideband, I would advise doing some test runs with a couple of jets that allow the mixture to be in the general range that you're looking for since not all engines make max power at any one specific air/fuel ratio. Most likely you'll be looking for readings somewhere between 12:1 and 13.5:1. As with any other method, choose the largest jet that works well.
The main jet has an effect on a wide range of throttle positions, and the largest impact from 3/4 to full throttle, but for this tuning section we will focus on WOT operation. If you find the main jet that provides the right amount of fuel for WOT, you've found the correct main jet. Problems at lower throttle positions that may occur with main jet changes should be addressed after the main jet is chosen, depending on where they happen relative to throttle opening. For example, if a larger main jet provides the best full throttle operation but results in rich mid-throttle conditions, the needle clip position or profile should be adjusted. For now, we are only concerned with selecting a main jet for best WOT power and reliability.
This trial and error method for selecting a main jet can use only the most simple of gauges that almost every scooter has, a speedometer (or a GPS or GPS app), for documenting results. Additional input can be obtained from gauges beyond a speedometer. A tachometer is a very handy gauge for all sorts of tuning, and they can be installed somewhat easily in many cases and are available for reasonable prices. Cylinder head temperature (CHT) gauges can also be very useful during carburetor tuning and aren't incredibly expensive or difficult to install. Some tuners use exhaust gas temperature (EGT) gauges, though they aren't very common among scooter enthusiasts. Wideband setups are excellent tuning tools, but again are uncommon for scooters because of their more prohibitive price points, increased difficulty to install, and being prone to fouling when used on two-stroke scooters. You can find more information on instrument solutions for scoots HERE.
You'll need a safe place to make long full throttle runs. I prefer to go at least a quarter mile, more if possible, sometimes as much as a couple of miles. There's no right or wrong distance, but I feel that very short distances may leave more room for error and test acceleration more than WOT operation. Acceleration is sometimes used for tuning, but I feel it could cause inconsistencies due to the main jet affecting throttle response or transition too much while other components aren't dialed in yet. For example, you could have the best main jet for your application installed, but rich or lean needle or idle circuit settings could cause stumbling, hesitation, or bogging when you get on the throttle. Over a very short distance or going strictly by timing runs, you could have a hard time selecting the right main jet. A main jet that's too rich or too lean could improve the symptoms of other components being out of tune enough to skew results in favor of an improper jet. If you're using a CHT, you may find that longer runs allow the temperature to level out better so it's readings can be utilized to a greater degree of accuracy. Choose some type of landmarks to use for starting and ending points so you can accurately repeat the distance. Things like signs, driveways or intersections, trees, road markings, or anything easily distinguishable can work.
Ideally you should choose a straight tuning spot that has little to no traffic or other obstacles and where the speeds you'll be doing are safe and legal. It's also important that you can stop and start and turn around safely. Don't put yourself or others in danger by tuning in an inappropriate area. Also keep your neighbors in mind. There's no sense in getting on their bad side if they think your scooter is too loud or you're going too fast when there are usually more options that won't tick anyone off if you put a bit of thought into it. If possible, a track or private area that you are allowed access to is best. You need to be able to go the entire distance safely without getting on and off of the throttle for traffic, turns, or other hazards. The stretch of pavement that you choose should be relatively flat because inclines or declines can throw off results quite a bit. You also need to be able to make WOT runs in opposite directions in the exact same area. Making a pass in each opposite direction will aid in reducing or eliminating the effects of outside influences like wind or grade.
It's important to tune in appropriate conditions as well. Strong winds hitting you from any direction can make tuning of any sort aggravating at best and seemingly impossible at times. The calmer the better. Do your tests when the temperature and humidity are most similar to your average riding weather, because large temperature and humidity changes will affect the jetting needed for optimal results. Since weather changes affect the tune, you should allow plenty of time so that all tuning can be done in one session.
Once you've found a place to do WOT runs and installed the main jet you selected as a starting point, you can begin working at finding the best main jet. You should start your scooter and allow the engine to warm up for a few minutes prior to any tuning run. Cold and hot engines require different mixture ratios for best operation and you want to let the automatic enricher (if equipped) stop adding fuel. You may also reduce your risk of engine damage by letting it warm up a little before heading out wide open throttle. If you have a vacuum operated fuel petcock, it may take a few seconds of cranking or kicking the engine over to allow fuel to fill the bowl between jet changes so that the engine can start. Some prefer to disconnect the vacuum line leading to the petcock and apply mild suction prior to cranking the engine over so the bowl can fill for quicker starts. Don't forget to replace the hose afterward. The process is much simpler with a manual fuel shutoff, and the bowl should refill within seconds after turning the fuel supply on after a jet swap.
While the scooter is warming up, get your riding gear on and make sure you have a pen and paper or some way to record a bit of information handy for your return. You may even want to take the note taking materials along with you.
After the engine has had a chance to get up to temperature, hop on. Find your starting landmark and twist the throttle all the way open. Hold the throttle wide open all the way until you reach your ending landmark, as long as you can do so safely. Keeps your eyes on the road and your surroundings, but try to pay attention to the gauges as well. Make a special effort to look at the gauges and make a mental note of speed, RPM, or any other data points that you'll be using as you reach the ending landmark. If you have a hard time remembering the numbers you may want to find a safe place to pull over and quickly jot the info down. If you own a helmet cam, like a GoPro, you could use it to record your runs so there is no need to remember everything. Smartphone apps may also be able to record your run and some even overlay GPS measured speed on the video.
Turn the scooter around and head back at WOT from the ending point to your original starting landmark. Again stay safe, but try to keep an eye on the gauges, being sure to notice speed and other info as you reach the final landmark. Take the scooter back to your work area and write down all of the information you just gathered and the main jet size used. Hopefully you at least have a maximum speed and/or speed as you passed your landmark points. You should have a set of info for each direction, that I usually label as "to" and "from". I usually create an "average" entry as well, containing the averages of to and from passes to better reduce error due to wind or other external influence. All you have to do to create an average is add to and from numbers and then divide them by 2. Here's an example using max MPH, but you can do this for any numerical data :
Average MPH = ("To" MPH + "From" MPH) / 2
Average MPH = (40MPH + 42MPH) / 2
Average MPH = 82MPH / 2
Average MPH = 41MPH
In addition to instrument readings, it is wise to note any observations that you may have made related to engine performance. For example, sputtering, bogging, smoking, it felt sluggish, it felt good, and so on. I also like to write down the current ambient temperature, humidity, and wind speed for future reference. There's no need to note the weather on each pass, but it's good information to have somewhere within your data from the day of tuning. Sometimes the carburetor needs to be re-jetted when weather changes drastically, such as from the hot summer to freezing winter, so having the weather information included may save you time if you need to switch around jetting for climate changes later.
After the first test pass is done and recorded, you'll need to decide which main jet to try on the second pass. Use any clues from your observations of the previous run to help you make the determination. Look through THIS PAGE containing symptoms of rich and lean for guidance. You can also remove the spark plug and take a quick look if you shut the engine off promptly after the last pass. A wet plug should be telling you that more than enough fuel is present (rich). A dry plug could mean that it's lean or that it's running fine, so the simple method is to see if the plug is wet or not if you are unsure which direction to go in main jet size. A wet plug or other symptoms of a rich condition indicate that you should move down a jet size (lower number). A dry plug or symptoms of a lean plug are reasons to move up a jet size (higher number).
If you experience severe symptoms you may want to jump a couple of jet sizes. This is especially true in the case of lean conditions since lean is more likely to be hazardous to the engine. Examples of severe symptoms would include things like sputtering or smoking heavily and struggling while being obviously under-powered (rich), very hot (lean) or cold (rich) temperatures if you're monitoring CHT, bogging or surging with a lack of power at WOT (lean), or soft-seizing (lean). If you don't experience anything that leads you to believe the tune is way off though, stick with moving one jet size at a time.
If you are totally uncertain whether you should go up or down on main jet size, move up a size.
Install the jet that you decide on and then make another test pass just like the prior one. Warm the bike up again if you've taken more than about 10 minutes between runs. Use the same test area and landmarks. Again go WOT in both directions and observe your gauges and the sound and feel of the engine. Record all of the info and the main jet size used when you return from the ride and average the results as well if you did so for the first run.
Examine the results from both of your test rides. If the tune is still obviously rich or lean, you probably won't need the results to clue you in on which jet to try next. If performance improves or stays about the same, continue changing jet size in same direction one step at a time. If performance degrades, go the opposite way in jet size, skipping over the jet that you have already tried. Increases in MPH or RPM are indicators of improved performance. Decreases in MPH or RPM are indicators of degraded performance. Here are a few examples of scenarios to assist in making the concept clear :
Example 1 : You started with a 95 main jet and max speed averaged 41MPH. You switched to a 90 main jet and avg max speed increased to 43MPH. You would want to try another smaller jet, like an 85, next.
Example 2 : You started with a 95 main jet and max RPM was 7400RPM. You switched to a 100 main jet and RPM increased to 7600RPM. You would want to try another larger jet, like a 100, next.
Example 3 : You started with a 95 main jet and max speed averaged 41MPH. You switched to a 90 main jet and max speed decreased to 37MPH. You would want to move in the opposite direction. Skip over the 95 main jet that you have already used and move up to a 100 main jet.
Example 4 : You started with a 95 main jet and max RPM was 7400RPM. You switched to a 100 main jet and max RPM decreased to 7100RPM. You would want to move in the opposite direction. Skip over the 95 main jet that you have already used and move down to a 90 main jet.
Install the next main jet and do another WOT run and record the results. Follow the same pattern as you did last time. Continue to swap jets and do test runs until performance begins to get worse after it has improved. If you've taken good notes, comparing results with different main jets should allow a pattern to emerge. Usually you will see 1 or 2 main jets that have provided the best numbers (speed, RPM, etc...). Above and below those jets performance falls off. The main jets that resulted in the highest speed, highest RPM, and any other favorable variables that you've noted would be the choices for the best jet. If 2 jets are essentially the same, use the larger of the 2 for a richer and safer tune. This allows for better engine cooling and can help to prevent the engine from running lean when the whether gets cooler.
If you have trouble seeing a clear pattern while studying the numbers from your tuning passes you may want to redo some or all of the test runs. It would also be a good idea to examine your test procedure and conditions to look for any outside influences (wind, traffic, other mechanical issue with the scooter) that could be distorting results.
If you've been using steps of 5 jet numbers (85, 90, 95), you may also choose to try dialing the tune in a little closer to ideal by using smaller steps, such as 2.5 jet numbers (85, 87.5, 90, 92.5). You could then analyze the information again and determine the best of the new selection of jets. Some jets can even be found in 1 number increments (90, 91, 92), but tuning to that degree is not usually necessary and any minor benefit from the additional time spent dialing the tune in to that degree may go unnoticed.
Here's an example of typical information collected and how it would be evaluated to choose a main jet :
Main Jet |
Max MPH Avg |
Max RPM Avg |
80 |
39MPH |
7450RPM |
85 |
43MPH |
7500RPM |
90 |
44MPH |
7500RPM |
95 |
42MPH |
7450RPM |
100 |
40MPH |
7250RPM |
In the example above, the 90 main jet appears to be providing the best power according to the data reported. Jets larger and smaller exhibited reduced MPH and/or RPM. In this instance the 90 main jet would be the best choice for WOT power. The next closest result is from the leaner 85 main jet which points us toward using the 90 as well, again since it's best to err toward rich. Further fine tuning may be done using in-between sizes such as an 87.5 and 92.5 to see if more improvement can be had or if the richer jet would allow us to keep the cylinder cooler and safer while matching the 90's performance.
If you've followed the steps in this section, you should be finished dialing in the main jet and ready to move on. If you'd like to see an example of this process on video CLICK HERE.
Idle Circuit Settings
After selecting the main jet, the idle mixture and speed should be adjusted. You will need to set them again at the end of the tuning process, but I prefer to have the low throttle settings close before working with the mid-throttle tune. You'll need to locate the idle speed screw to begin.
139QMB Idle Speed Screw |
GY6 125-150 Idle Speed |
Minarelli Idle Speed Screw |
DellOrto PHBG Idle Speed |
|
|
|
|
Start the engine and let it warm up to operating temperature. Adjust the idle speed screw so that the engine idles without trying to stall out and without the rear wheel spinning quickly. 1,500-2,000RPM is usually an acceptable range if you're using a tachometer. Screwing the idle speed screw in (clockwise) should increase idle speed , and screwing it out (counter-clockwise) should decrease idle speed.
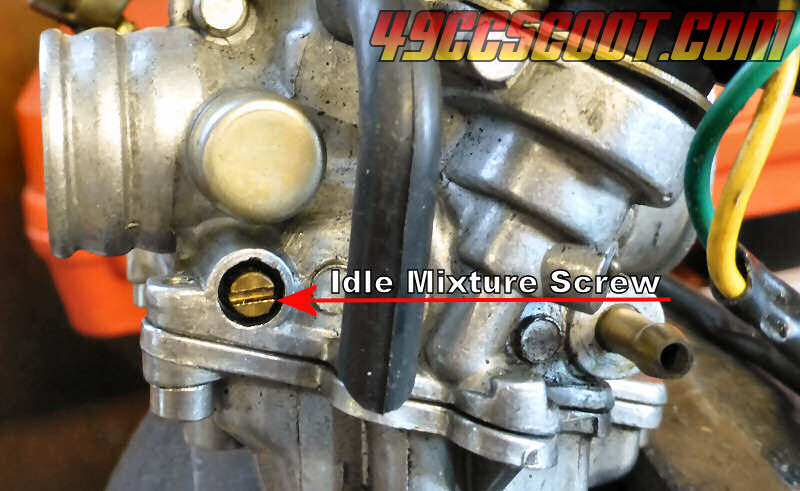
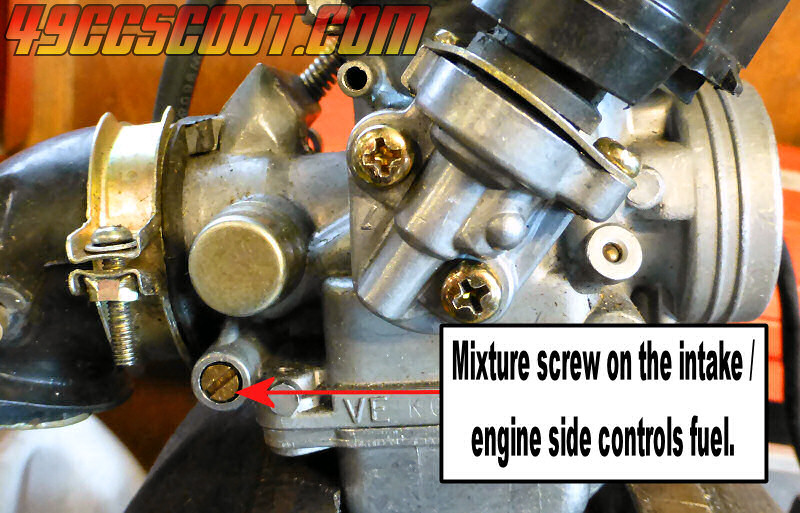
Now locate the idle mixture screw on your carburetor. It will be on the side of the carburetor and may be on the inlet or outlet side of the carb, depending on the model. If you can't find it, you may have a "sealed" carburetor. This is common scooters from the late 2000s and beyond. CLICK HERE for information about "unsealing the carburetor.
139QMB Mixture Screw |
GY6 125-150 Mix Screw |
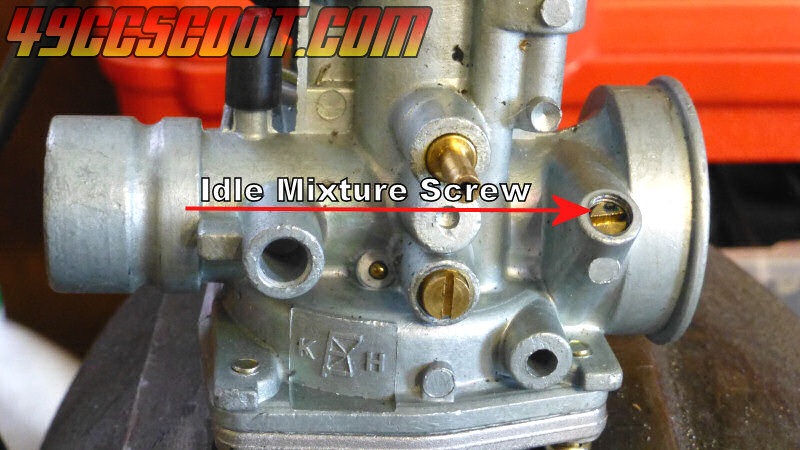
Minarelli Mixture Screw |
DellOrto PHBG Mix Screw |
 |
 |
 |
 |
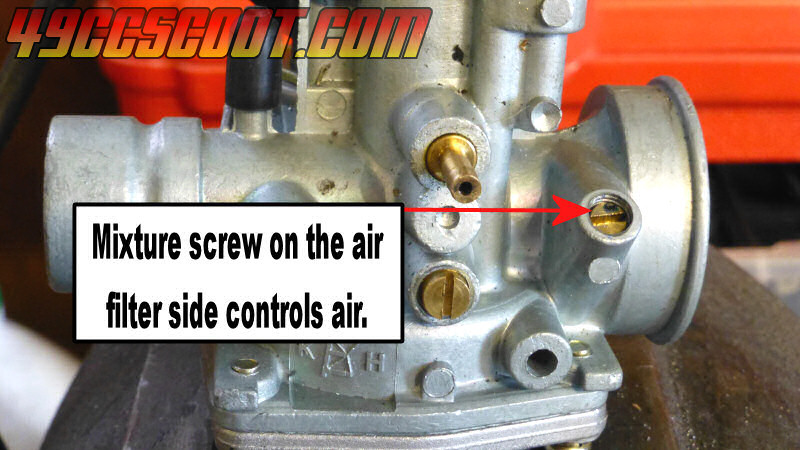
It is important to take note of the location of the mixture screw, because it will tell you what function the screw has so you know how to adjust it and make decisions based on it's adjustment. If your carburetor has the mixture screw on the inlet side of the carburetor, that's the side that the airbox or air filter connects to, the mixture screw adjusts airflow. Turning the screw in will block off an air passage and richen the mixture. Turning the screw out will open the air passage and lean the mixture. If your carburetor's mixture screw is on the outlet side, that's the side that the intake attaches to, the mixture screw adjust fuel flow. Turning the screw in blocks off a fuel passage and leans the mixture. Turning the screw out opens the passageway and enriches the mixture.
 |
 |
Before you begin adjusting the mixture screw, turn the screw in until it seats. Count the number of turns as you turn the screw in. Don't put much force on the screw when it stops, you only need to turn it until you're sure it's all the way in. Write down the number of turns. This will give you a reference point to return to, just in case you have trouble with the mixture adjustment and wish to start over from a point where you know the engine was at least operational. Then turn the mixture screw out the same number of turns that you just screwed it in.
 |
Turn the mixture screw 1/4 turn toward rich. Give the engine a minute to respond and listen carefully for any changes in the idle. If you have a tach, monitor RPM. If idle speed increases or smooths out, rotate the screw another 1/4 turn toward rich. If idle speed decreases or becomes rough, rotate the mixture screw 1/4 turn toward lean. You could skip the initial setting and go 1/2 turn toward lean if 1/4 turn toward rich decreases idle speed or quality, but I prefer to us a 1/4 turn step even in this scenario. Again, give the engine a minute to react and settle and see if the idle improves or degrades. Continue this process, adjusting the mixture screw 1/4 turn at a time until you find the range of settings that gives you the highest idle speed and a stable idle. Any time a change provides a positive result, continue that way. When a change provides a negative result, go the opposite way. As you move along, if the idle speed becomes too great, adjust the idle speed screw to keep it in check and then continue with mixture screw adjustments.
Once you figure out where the idle speed and quality are at their peak, there are a couple of options. You can continue the process using smaller increments by switching to 1/8 turn per adjustment. Some carburetors are more sensitive than others to small changes, so finer tuning may or may not provide much change. You could rotate the screw 1/8 turn toward rich and call it done for now. Just like the main jet and any other carburetor settings, err toward rich. If you switch to 1/8 turn tuning, adjust the mixture screw at least 1/16 turn toward rich when you finish to err toward rich.
Once you've settled on a mixture screw position, adjust the idle speed screw again if necessary. CLICK HERE to see the process on video.
If you find that the best idle qualities occur when the mixture screw is turned all the way in, you should replace the pilot jet. If your carburetor's mixture screw controls fuel, this is the leanest setting that blocks the most fuel flow and you should use a smaller pilot jet. If your carburetor's mixture screw controls air, this is the richest setting that blocks the most air and you should use a larger pilot jet. If the best idle is found when the screw is turned out beyond 3-4 turns, or when the spring below the mixture screw is not providing enough tension for the mixture screw to remain secure, you should replace the pilot jet. If the mixture screw controls fuel, this is the richest setting that allows the most fuel flow and you should use a larger pilot jet. If the mixture screw controls air, this is the leanest setting that allows the most airflow and you should use a smaller pilot jet.
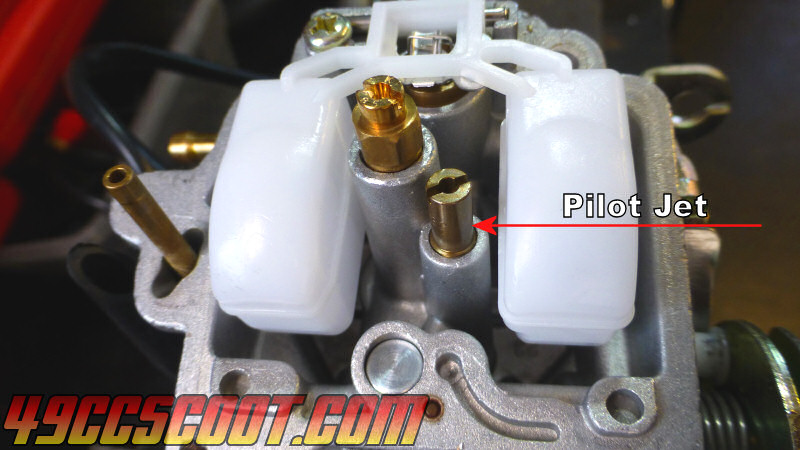
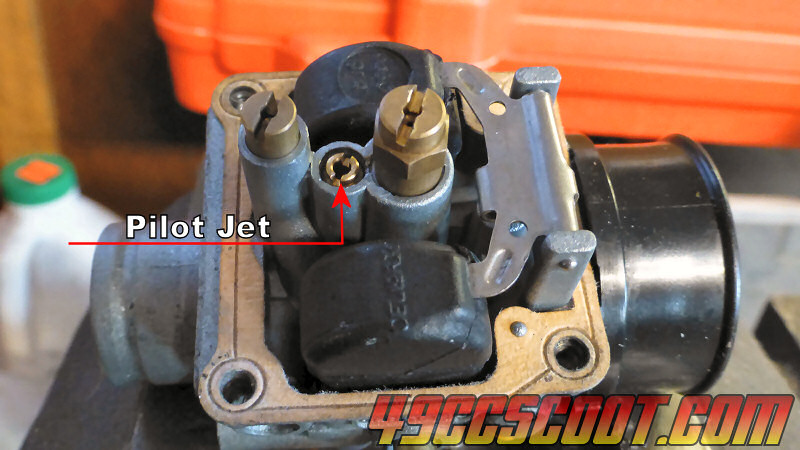
The pilot jet is located near the main jet in the bottom of the carburetor and it is replaced in a similar manner. Jets should be numbered to tell their size. Larger numbered pilot jets deliver more fuel for a richer mixture and smaller numbered jets deliver less fuel for a leaner mixture. Pilot jets are screwed in or out to install or remove them. There is no adjustment, just screw the pilot jet in snug.
139QMB Pilot Jet |
GY6 125-150 Pilot Jet |
Minarelli Pilot Jet |
DellOrto PHBG Pilot |
 |
 |
 |
 |
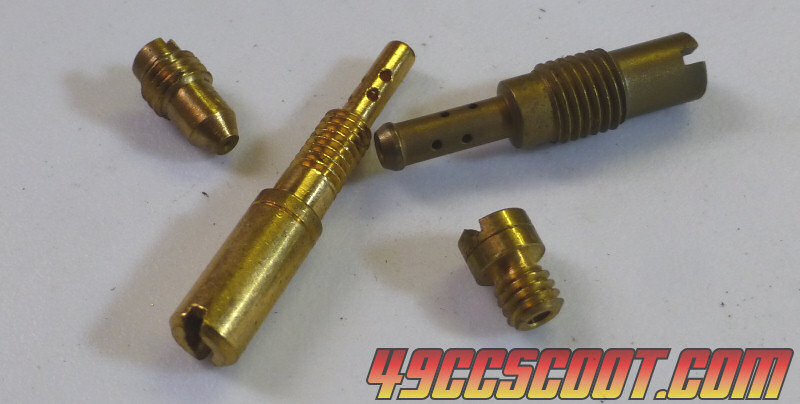
Various Pilot Jets |
|||
 |
|||
After replacing the pilot jet, the idle mixture setting process will need to be repeated.
Needle And Atomizer Info
Once the main jet selection is done and you've adjusted the idle settings, you can begin working on 1/4 to 3/4 throttle operation. There are multiple factors that influence the air/fuel mixture from 1/4 to 3/4 throttle openings, but I will focus on the needle. The needle is more properly called the jet needle, but most of the time I will refer to it simply as the needle. In many cases a reasonable state of tune can be achieved by making adjustments to the needle position and/or changing the needle, without needing to swap other components. In the case of some stock and less popular carburetors, the other components, such as throttle valves (slides) or atomizers, can be hard to come by. Sometimes it's even difficult to find different needles that will work for a carburetor. There is often a great selection of all kinds of parts available for popular aftermarket carburetors, but even then I attempt to get my 1/4 to 3/4 throttle operation straight with needle settings first.
Before going any further into the tuning process, let's look at what a needle is and what it does. Novice tuners often have a hard time remembering how to change needle settings to get a desired effect, but I think a basic understanding of what the needle does will make it much easier.
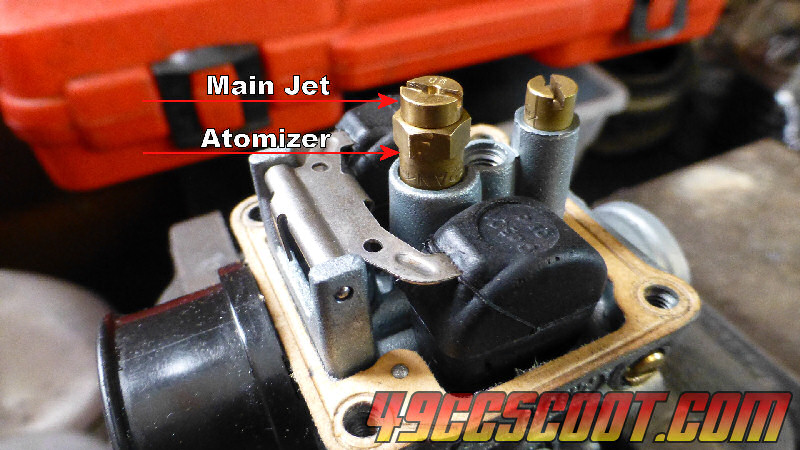
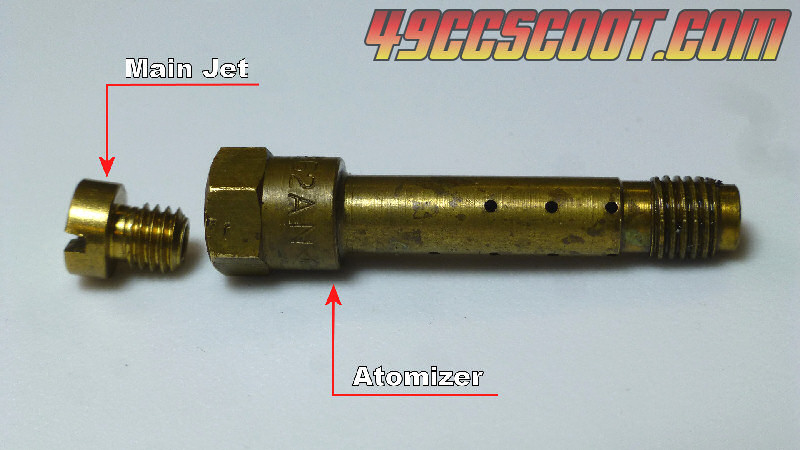
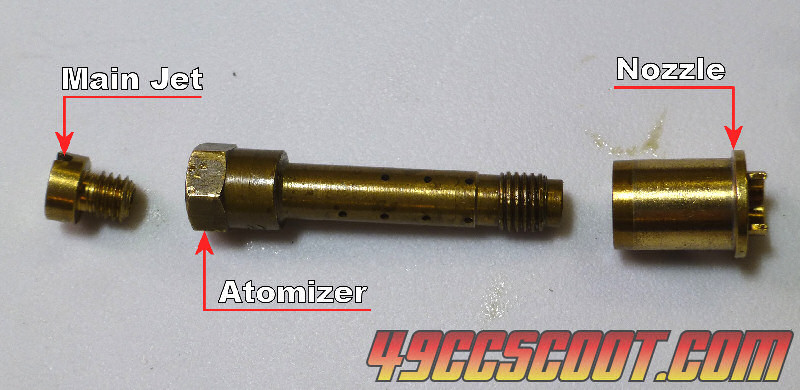
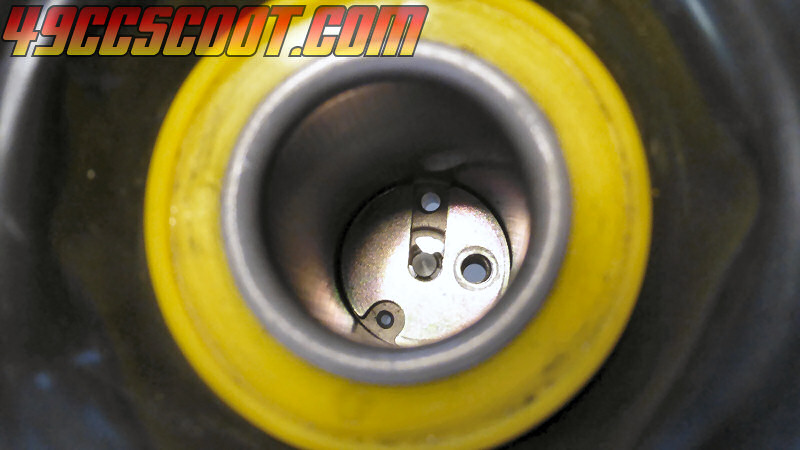
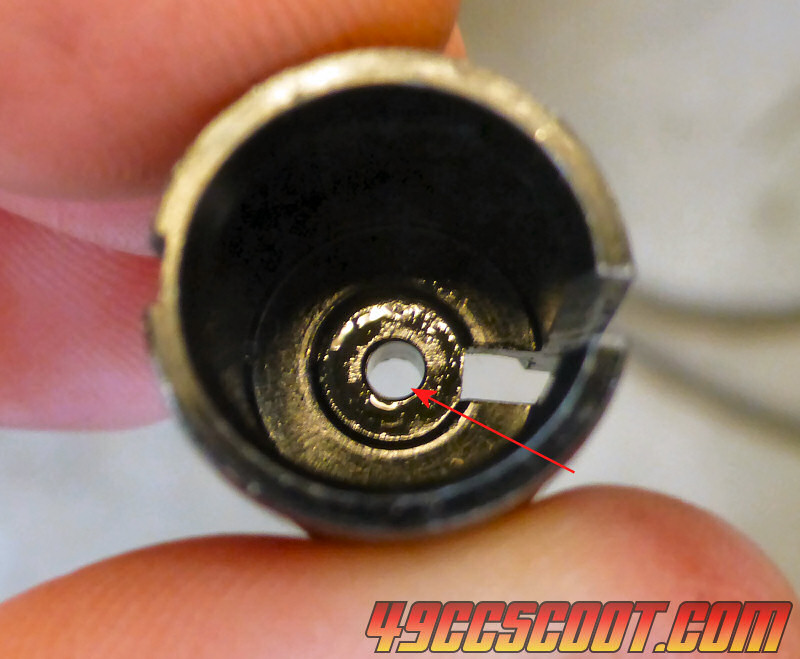
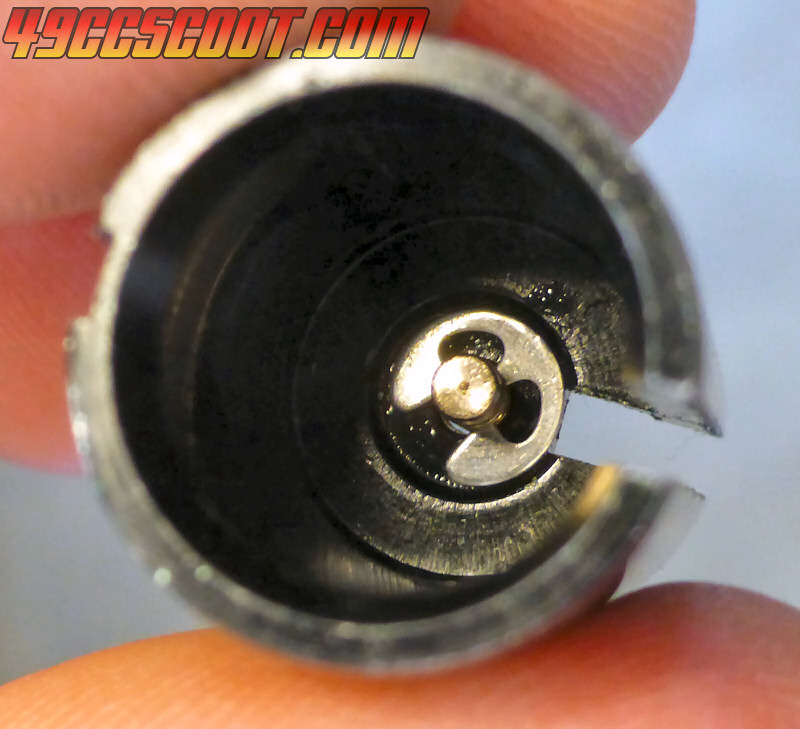
The main jet screws into the atomizer (needle jet), which provides a passageway for fuel to travel through into the carburetor's venturi where it mixes with incoming air and subsequently makes it's way into the engine. The atomizer has holes in it's sides to allow air to start mixing with the fuel before it reaches the venturi for finer atomization, because the goal is a mixture as close to homogeneous as possible.
 |
 |
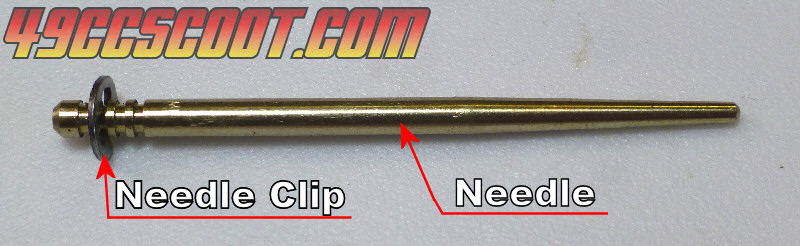
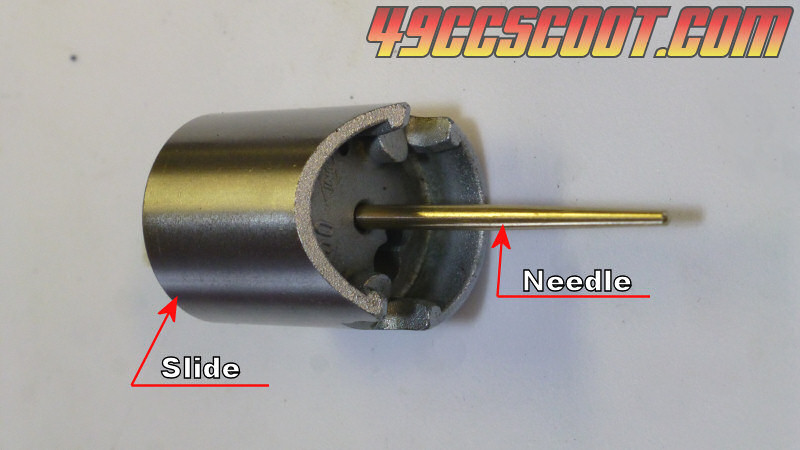
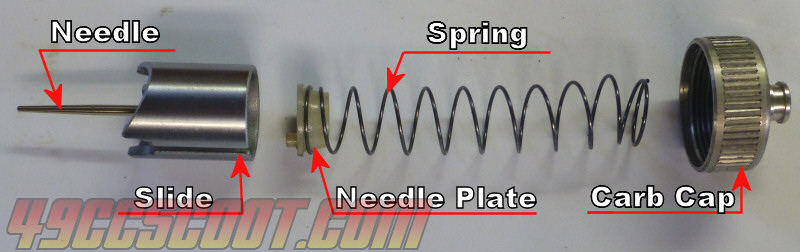
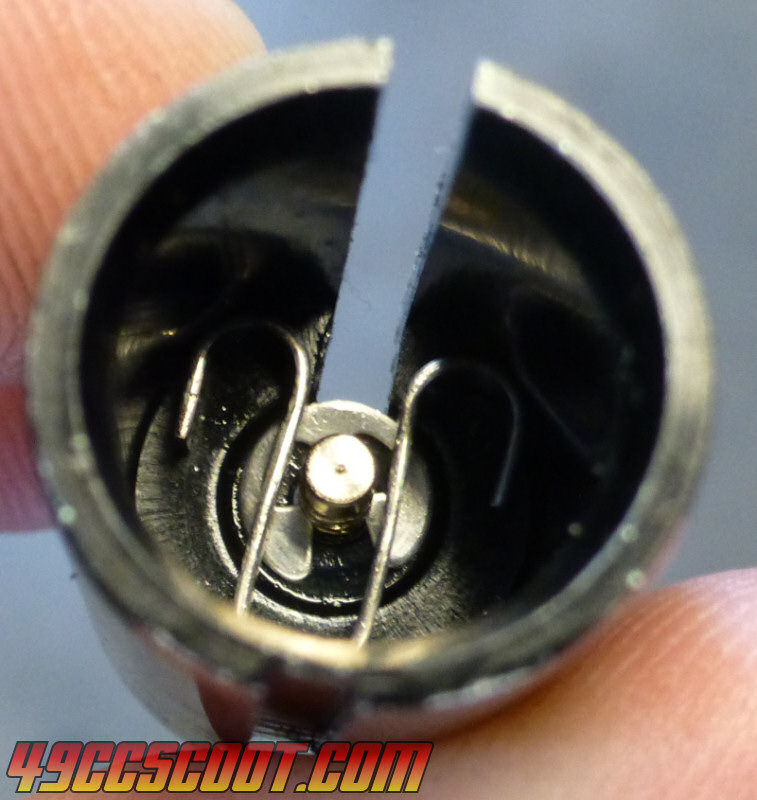
The needle is a rod with a long tapered section at one end. The needle goes through the center of the slide and the majority of it protrudes downward, with the tapered end sitting inside of the atomizer. Grooves in the needle allow a clip to be secured near it's top so it won't fall through the slide. There is a clip or needle plate above it that allows the throttle return spring to put pressure on the needle so it stays firmly in place inside of the slide and moves along with the slide when throttle position changes.
 |
 |
 |
 |
 |
|||
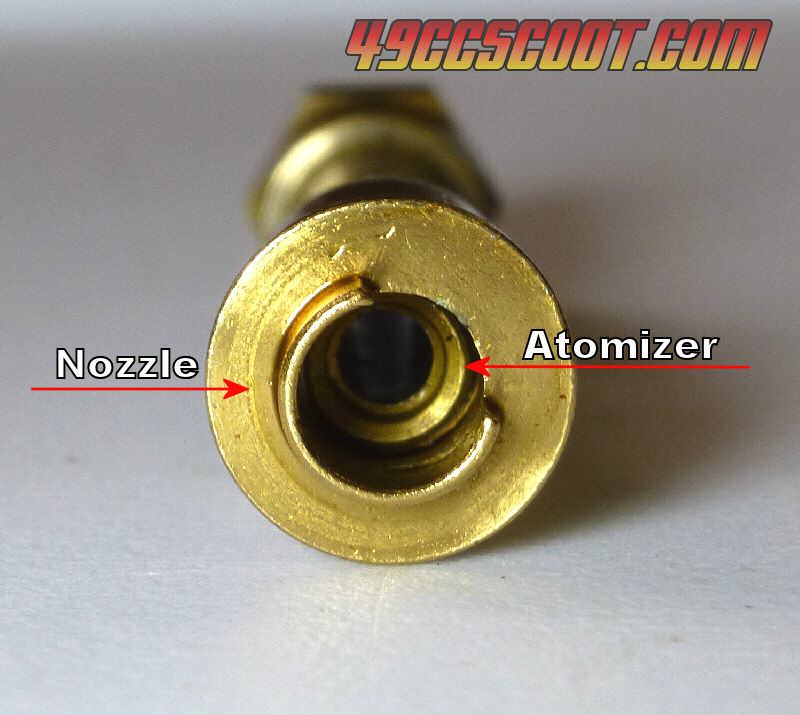
I want to show this simply so there's no confusion if you see an "extra" piece in your carburetor between the slide and main jet that hasn't been mentioned. There is also a nozzle, sometimes referred to as an atomizer bushing, of some sort between the atomizer and the venturi. The nozzle design changes airflow/vacuum properties, but it's the atomizer that interacts with the needle for fuel metering purposes. I mainly wanted to mention it for clarification, so no one thinks their carburetor has some oddball part that makes this needle and atomizer information irrelevant to them.
 |
 |
 |
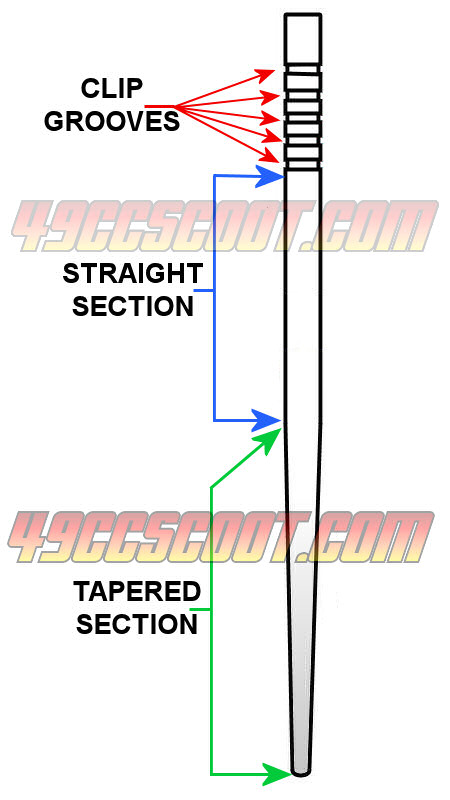
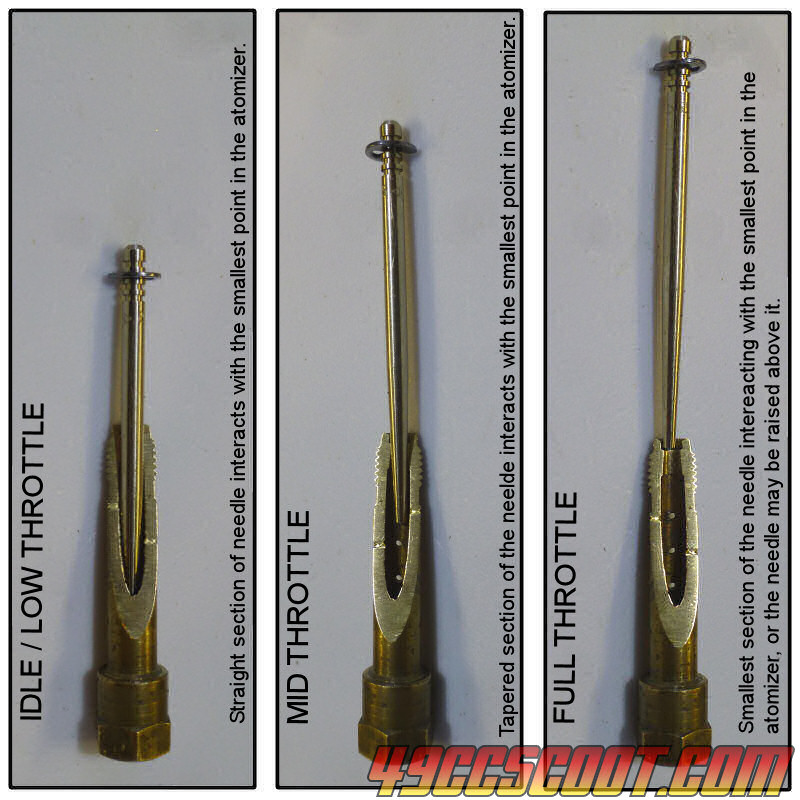
The needle is designed in a way that allows it to meter fuel delivery throughout the throttle range. It has a long straight section at the top with a diameter that should somewhat closely match the inside diameter of the metering point in the atomizer. This is where the needle should begin to enter the atomizer when the throttle is closed or mostly closed. In this position, the needle is nearly blocking, or at least severely restricting, flow through the atomizer and into the venturi. As the throttle is opened farther, the needle pulls up out of the atomizer more and more. As the needle rises, it's largest cross-section comes up above the atomizer and it transitions to the tapered lower section of the needle interacting with the atomizer's metering point. The more the needle is raised, the smaller the tapered cross-section of the needle is and the less it blocks or restricts flow through the atomizer. The less the atomizer is restricted by needle diameter, the more fuel can make it's way into the venturi and richen the air/fuel mixture. Blocking off too much of the atomizer at any point with a large needle diameter will cause a lean condition in that spot of the throttle. Having too small of a needle diameter at any point will allow an excess of fuel past and cause a rich condition in that section of the throttle. At full throttle, the needle's tip is at the metering point or above it to allow the maximum amount of fuel past.
Throttle movement lifting the needle out of the atomizer. |
Atomizer cutaway. |
Needle and atomizer at different throttle openings. |
 |
 |
 |
Needles are available in various profiles for some carburetors. Their straight section diameter, tapered end diameter, or the length of straight and tapered sections may be different. Thinner needles richen the mixture and thicker needles lean the mixture in the affected throttle opening range. Straight section diameter changes the mixture at low throttle openings. Tapered diameters alter the mixture at wider throttle openings. Moving the beginning of the tapered section nearer the top of the needle (clip end) with a shorter straight section will richen the mixture at lower throttle openings. Moving the beginning of the tapered section away from the needle's top with a longer straight section delays enrichment until the throttle is opened farther. The combination of changes in diameters and lengths can make drastic changes in tuning.
Needle profile examples. |
 |
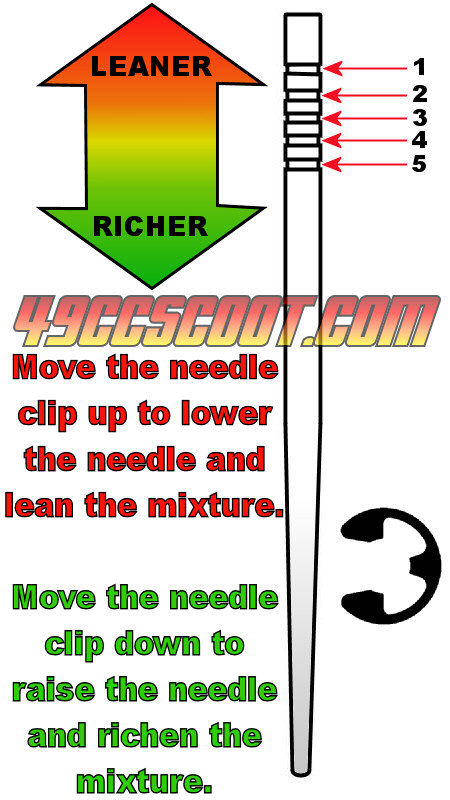
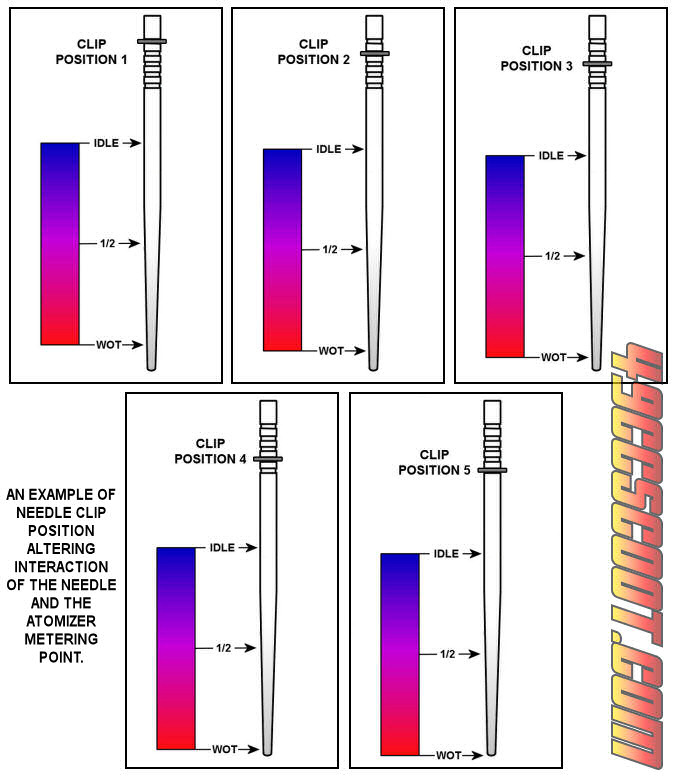
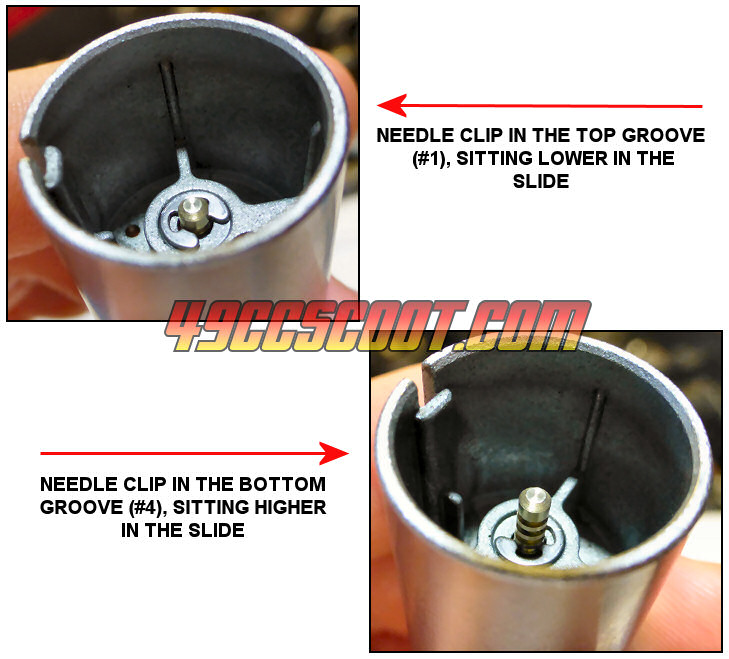
Needles usually have multiple grooves to accept the needle clip in a tight grouping near the top of the needle. Changing the position of the needle clip allows us to modify the interaction of the needle and the atomizer to alter fuel delivery. If the clip is moved up into a groove nearer the top of the needle, the needle will sit lower in the slide and protrude down farther into the atomizer. That would mean more throttle opening is necessary to reach the richer tapered section of the needle and cause part throttle settings to be leaner. If the clip is moved down to a groove nearer the tapered end of the needle, the needle will sit higher in the slide and not go down as deep into the atomizer. This setting would require less throttle opening to reach the thinner tapered section of the needle and richen the mixture at earlier throttle openings. In the simplest terms, raising the needle (lowering the clip) will richen the part throttle mixture and lowering the needle (raising the clip) will lean the part throttle mixture.
Needle clip positions. |
Needle & atomizer interaction with clip position changes. |
Clip settings. |
 |
 |
 |
How To Change Needle Settings
Since there are multiple styles of carburetors that readers may be tuning, I'll go over how to swap the needle clip position or needle in a few common carburetors. These are :
- CV (constant velocity) carburetors, like the ones found on most stock 139QMB / GY6 four-stroke scooters.
- Stock slide carburetors, as found on many two-stroke Minarelli powered scooters.
- Dellorto PHBG carburetors, common aftermarket slide carburetors.
 |
CV Carburetor Needle Changes
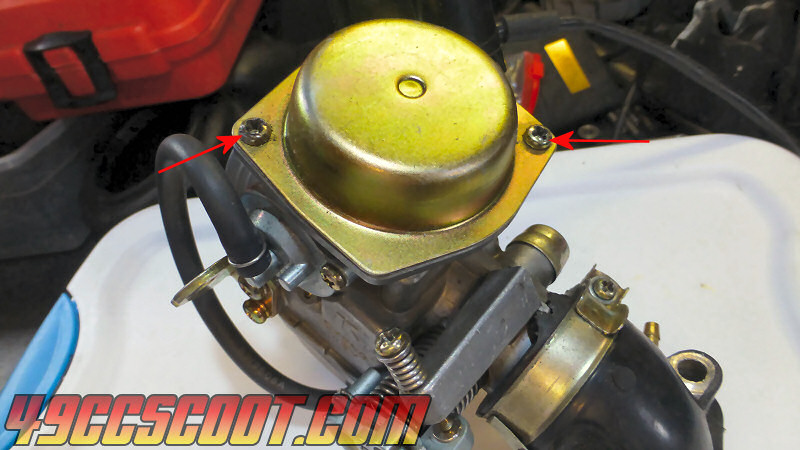
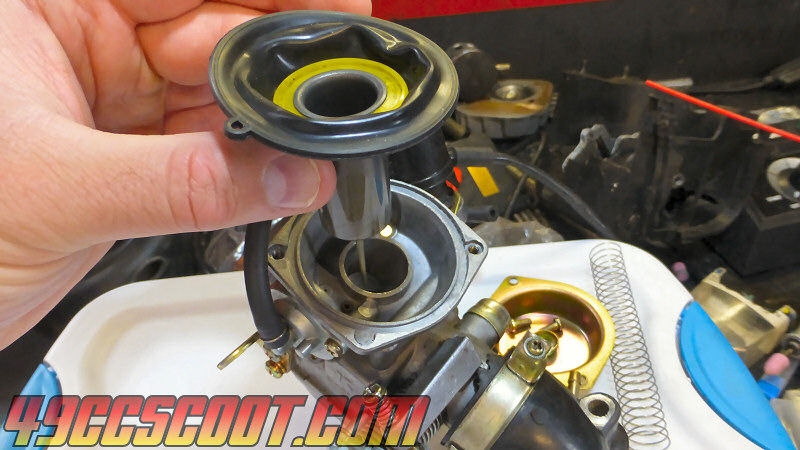
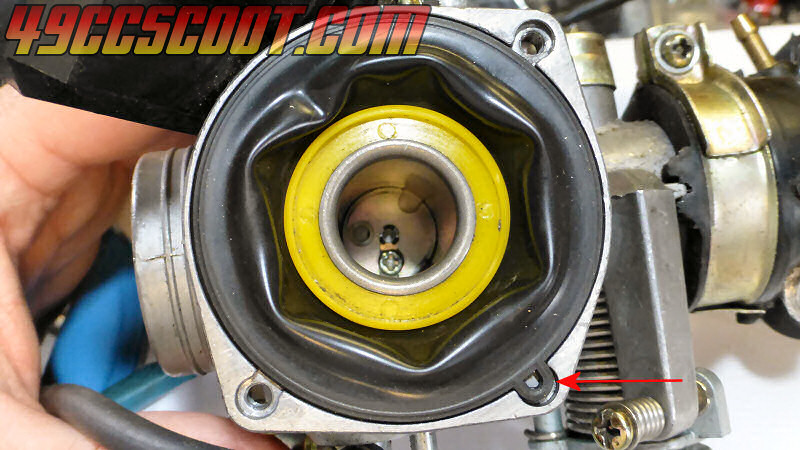
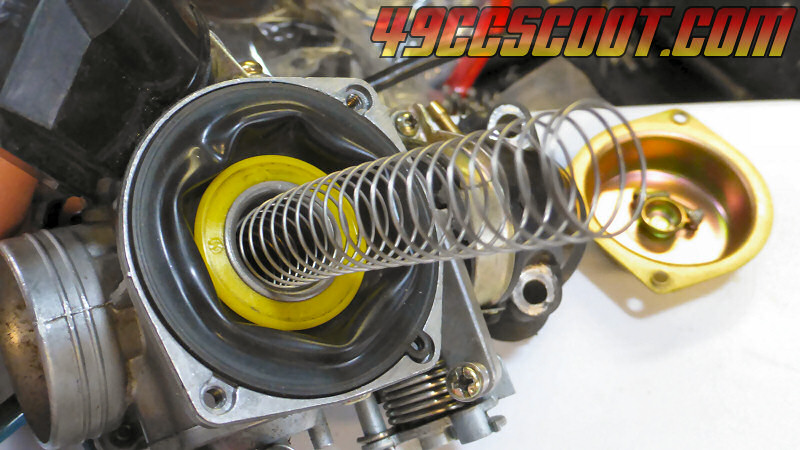
Begin by removing the screws holding the top/cap of the carburetor in place and setting the cap and screws aside. Hold a little bit of pressure on the cap as you remove it so the spring below the cap won't cause it to pop off when the screws are out. Then you should see a spring. Remove that as well. Pull the diaphragm and slide assembly straight up and out of the carburetor, being careful because there may be loose parts inside of the slide.
 |
 |
 |
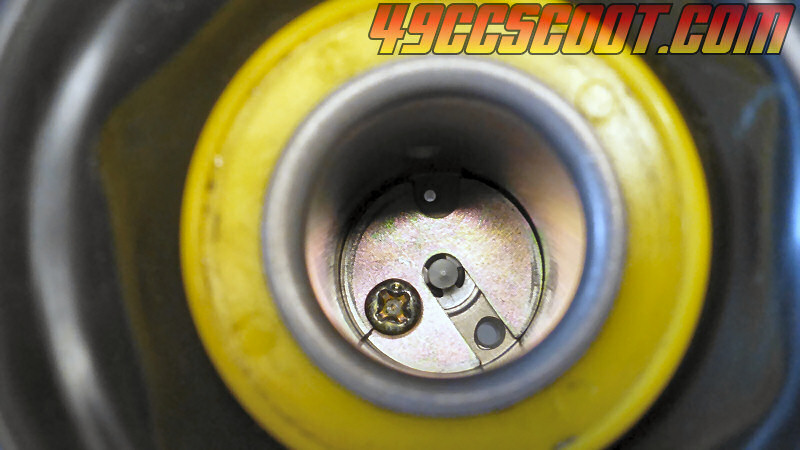
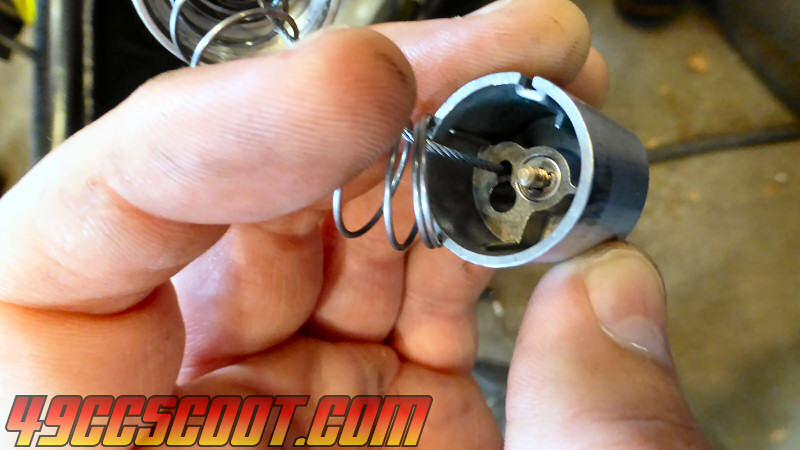
Look down inside of the slide and you should see some type of device that keeps the needle in place. It is usually either a flat steel needle plate or a plastic piece that sits over the needle.
Steel needle plate. |
Plastic needle retainer. |
 |
 |
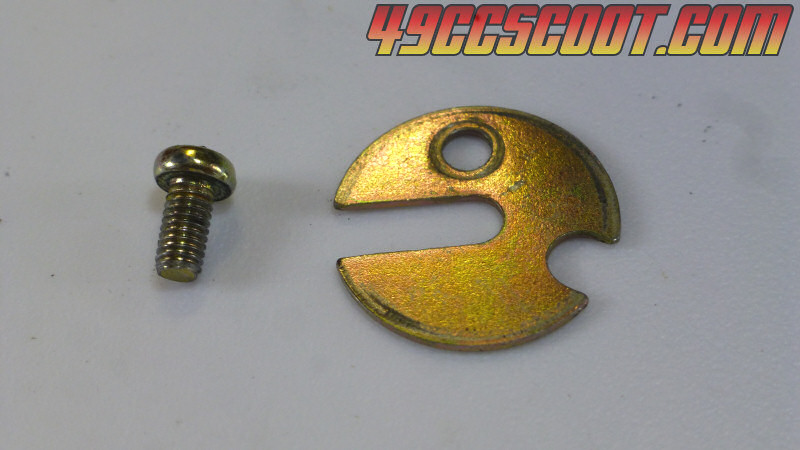
If you have the metal needle plate, remove the screw through it and then you can turn the slide upside down so the plate, screw, and needle will come out. Be careful not to lose anything.
Needle plate and screw. |
Turned upside down. |
Don't lose anything! |
 |
 |
 |
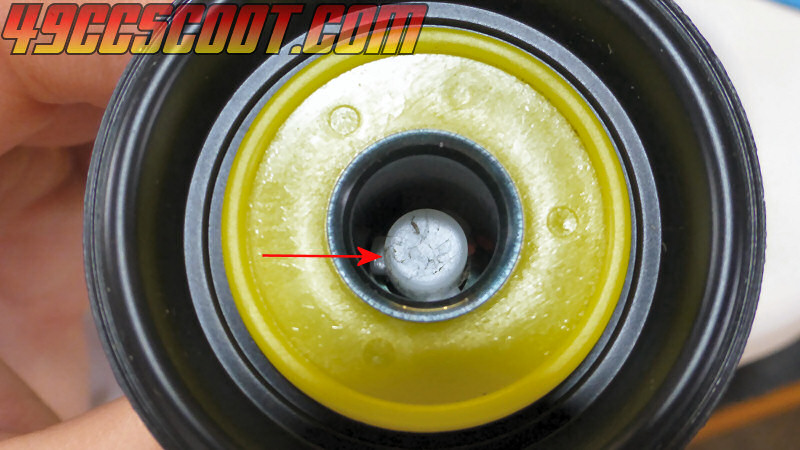
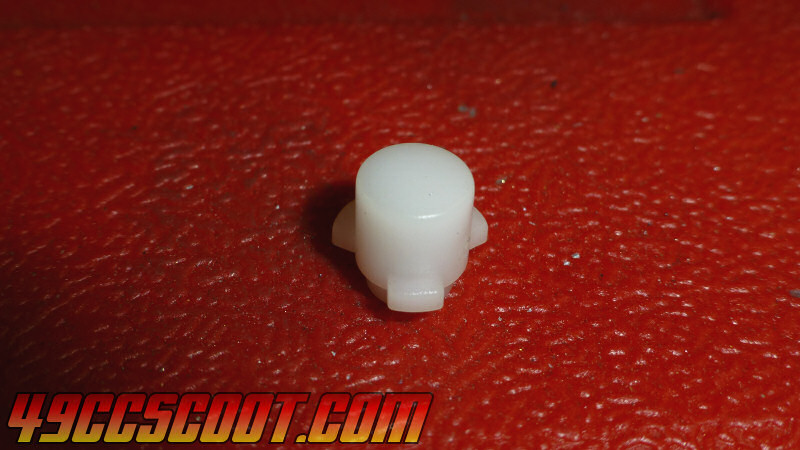
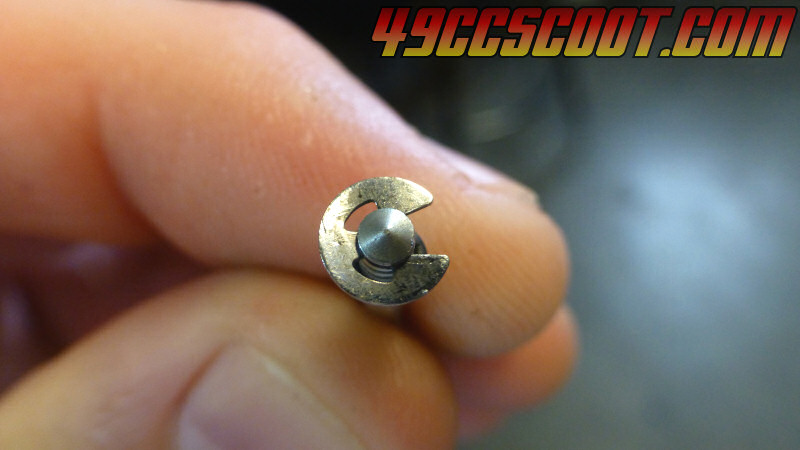
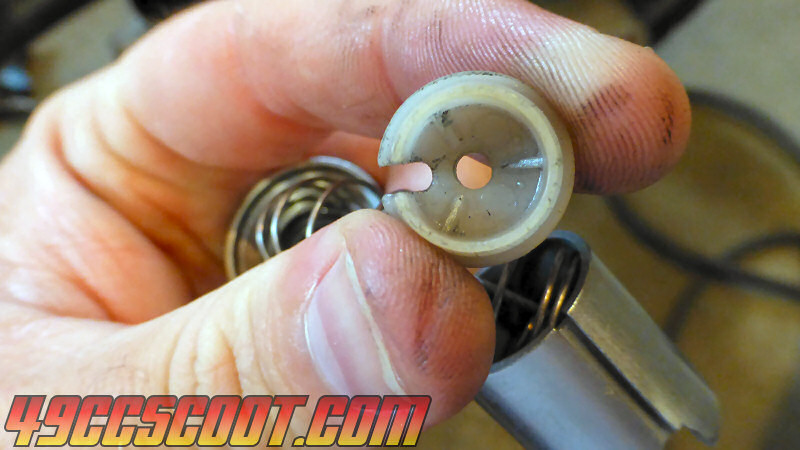
The plastic needle retainer is the easiest to deal with. Simply turn the slide upside down and the plastic piece should fall out, followed by the needle.
Plastic retainer. |
 |
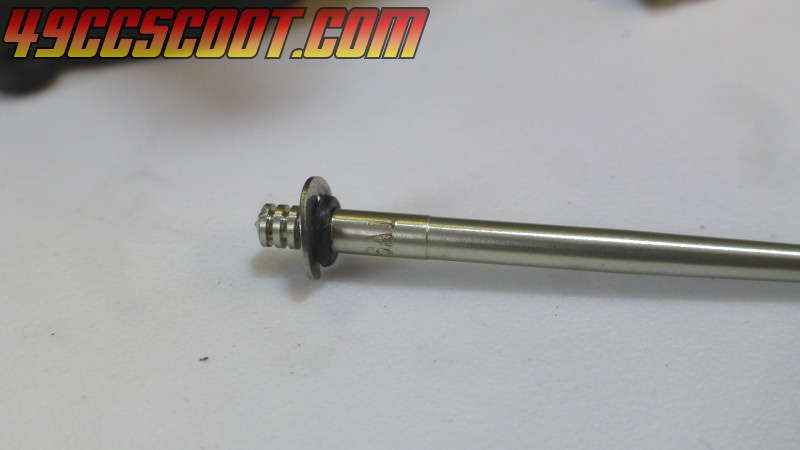
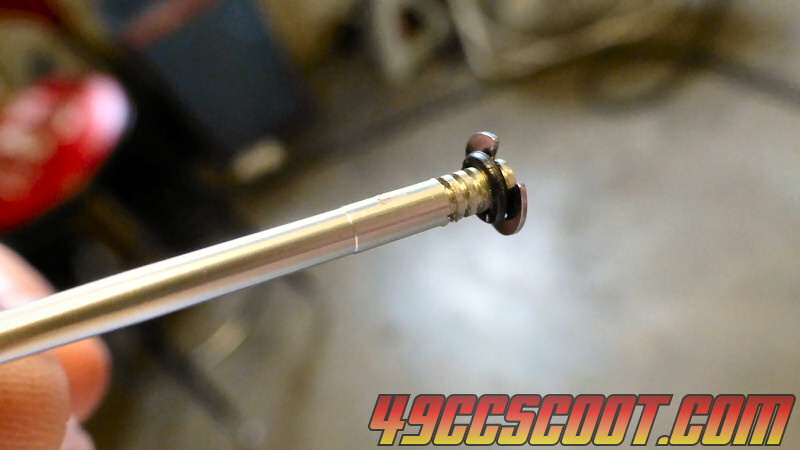
There is a tiny o-ring that usually ends up on the needle below the clip or stuck in the recessed center of the slide. You can leave it wherever it stays, but be certain it's secure and does not get lost while you work on the needle settings. If the o-ring is dry, cracked, or otherwise damaged, replace it. You may even be able to find one that works in a hardware store in a pinch if you don't have a good local scooter shop or don't wish to wait for an internet order.
 |
 |
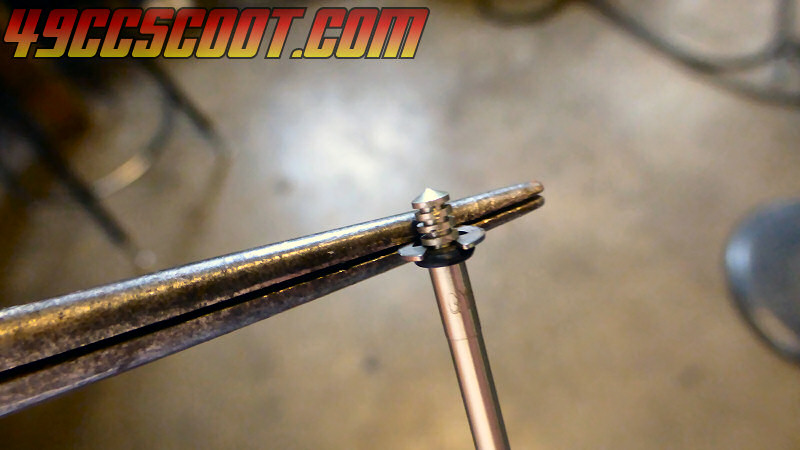
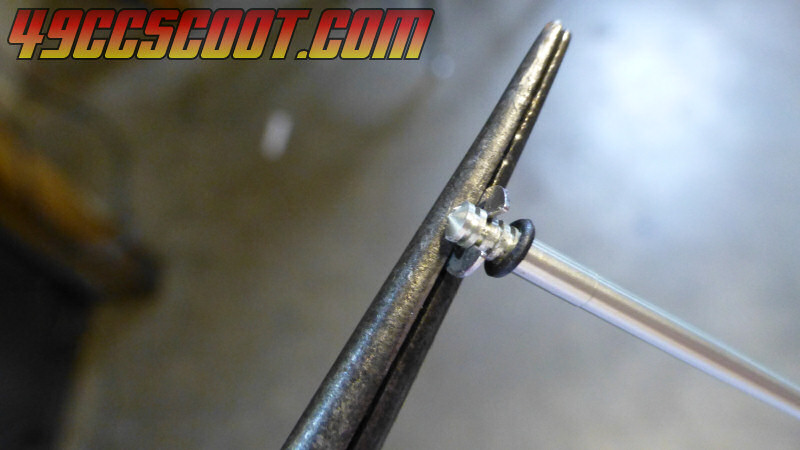
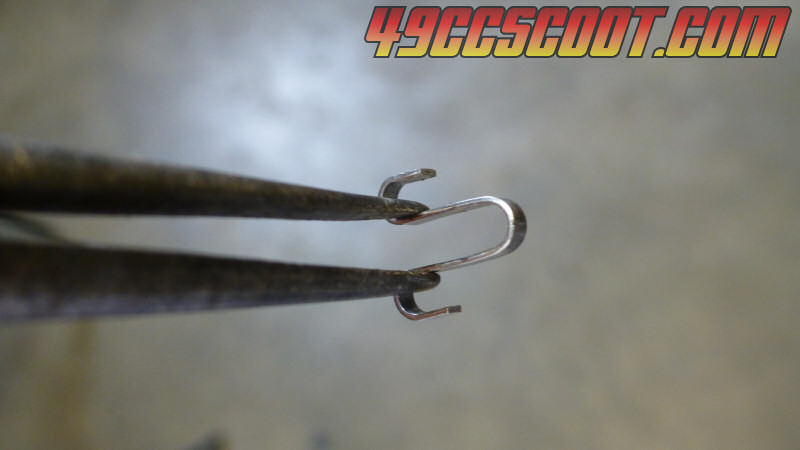
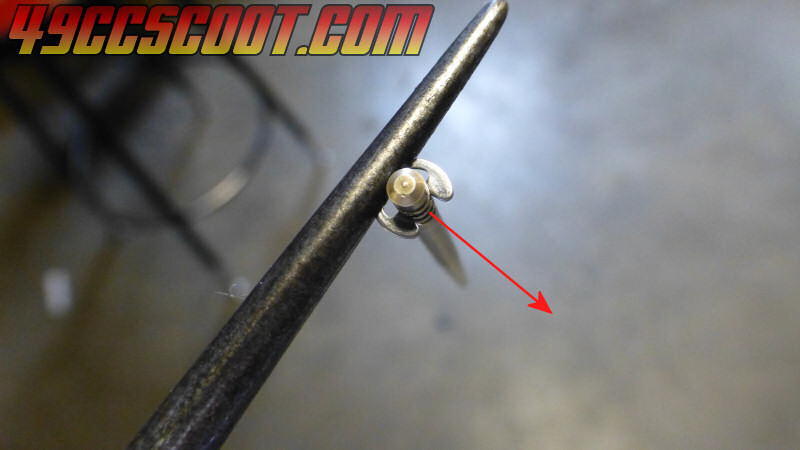
Use a small pair of needle nose pliers to grab the clip as shown below. Then pull the needle out, toward the opening in the clip to remove it. You may even be able to do this without tools. Whatever method you choose, always be careful not to bend the clip.
 |
 |
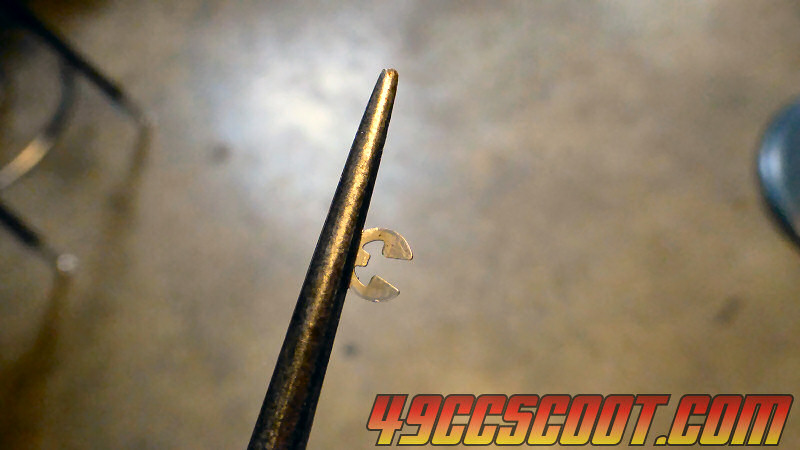
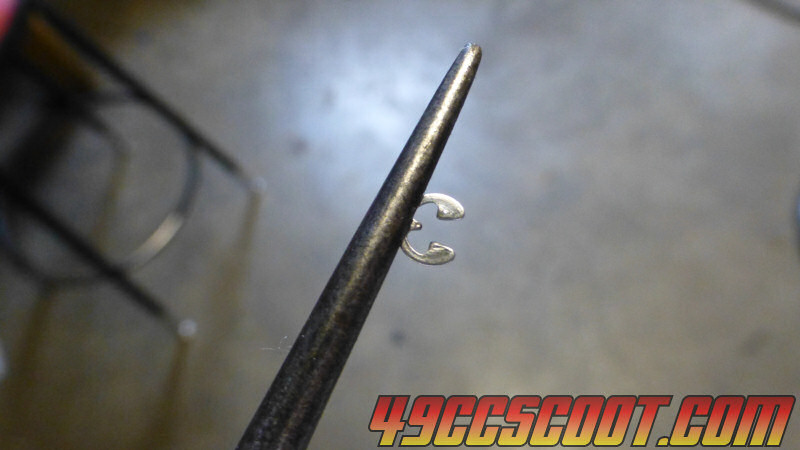
If you are changing needle clip position, keep the clip in the pliers or hold it tightly however you did before. Then line up the clip with the groove on the needle that you want to switch to and push the needle into the opening of the clip. Make sure the needle and clip are totally seated and that the clip is not loose. If the clip is loose, squeezing the open ends together gently may fix it. Otherwise, replace the clip. Sometimes hardware stores carry tiny e-clips that fit, just be sure to take the needle along with you to help you find what you need.
 |
 |
 |
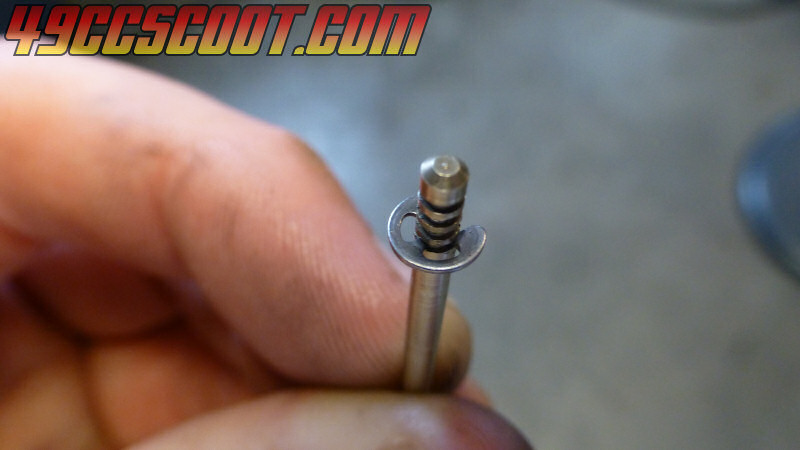
If you are swapping the whole needle, remove the clip and then reinstall it onto the new needle.
Make sure the o-ring is either moved up against the bottom of the needle clip, or still sitting in the slide's center recess. Then drop the needle through the hole in the center of the slide, tapered end first.
 |
 |
Next, you'll need to install the needle plate or retainer above the needle inside of the slide. For the steel plate, place the plate inside of the slide. Rotate it so that none of the holes in the slide are being blocked by the plate. You may need to flip the plate over if you can't get the holes to align with cutouts in the needle plate. Then secure the plate with the screw.
Proper alignment. |
 |
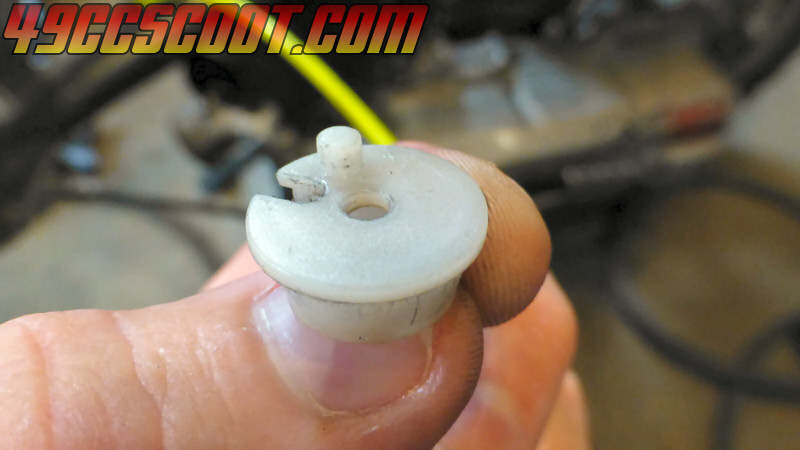
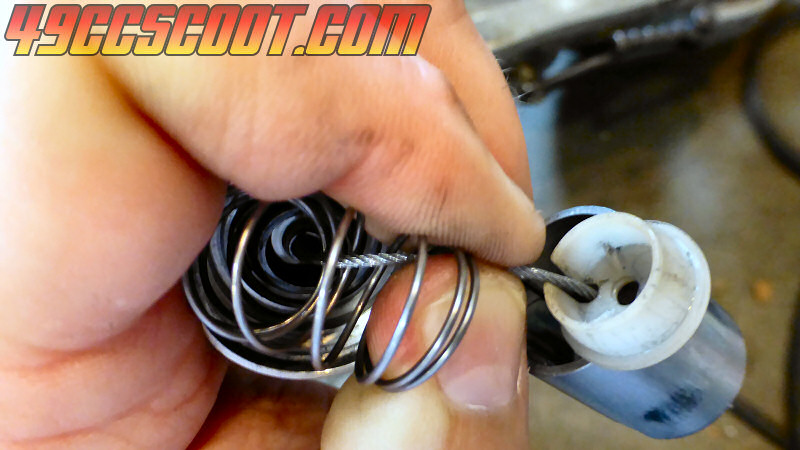
If your carb is equipped with the plastic retainer, you should notice that one end of it is flat and the other is open. Place the open end down so it will cover the end of the needle. Then drop the retainer into the slide. One trick is to put your thumb or finger on the bottom of the needle and push it upward. Then place the retainer on the needle and slowly lower them into the slide by moving your thumb or finger.
Open end. |
Simple installation. |
 |
 |
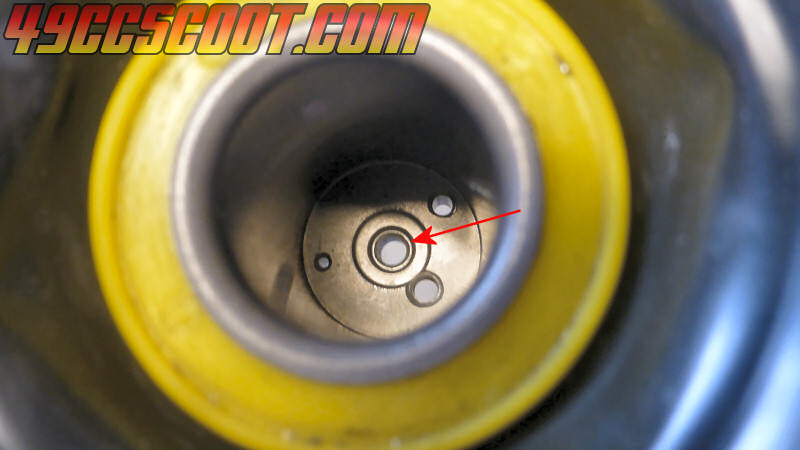
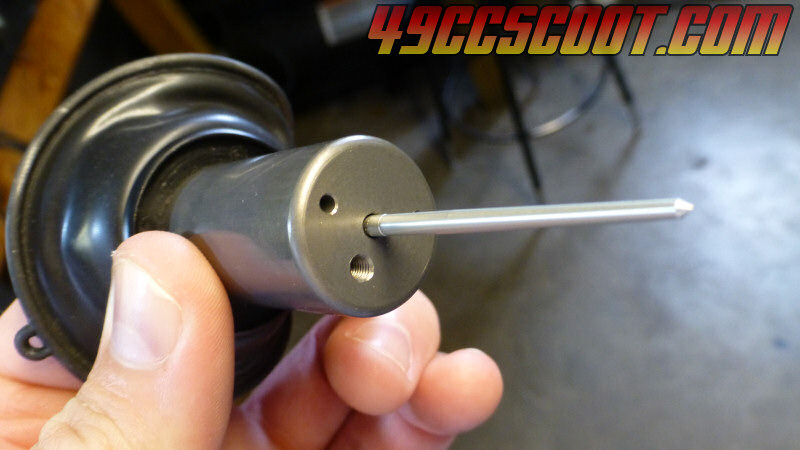
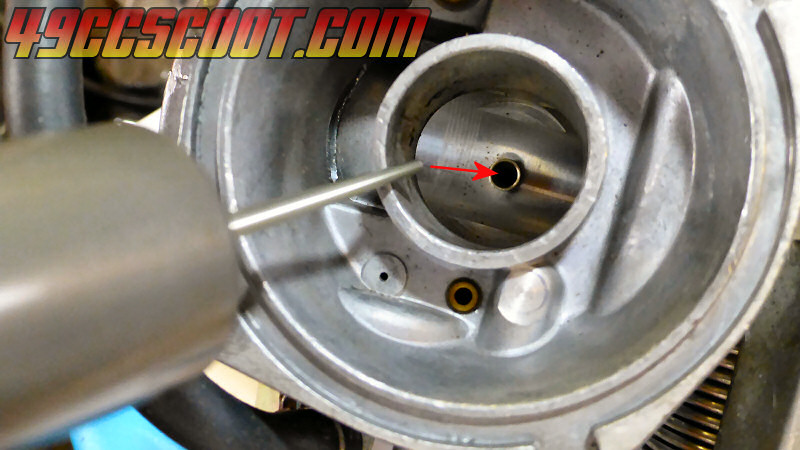
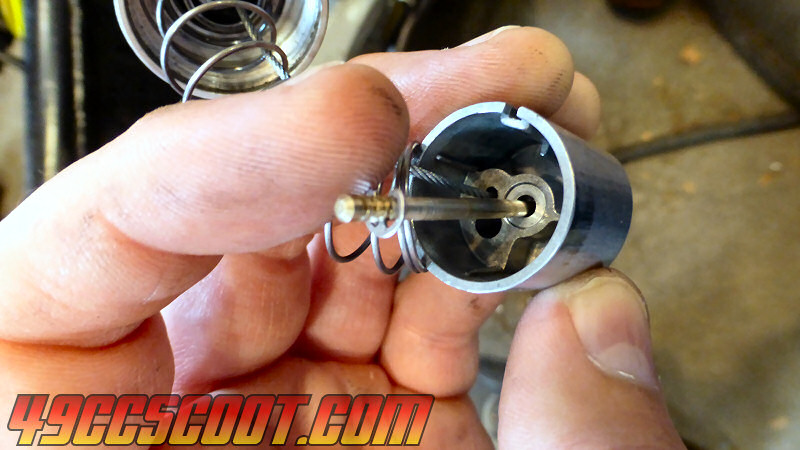
Once the retainer is installed, place the diaphragm and slide assembly into the carburetor. Be careful to align the needle with the nozzle in the carburetor without using force. Excessive force could bend the needle or damage the nozzle. If all is well, it should slide in almost effortlessly. There is a nub on the diaphragm and a matching recess in the top of the carburetor. They must be aligned for proper fitment and sealing.
 |
 |
Place the spring in the slide and then put it into the bottom of the carb's cap so that it fits around the center section of the cap. Then put the cap back on. Hold light pressure on the cap as you install the screws to secure it.
 |
 |
 |
See this process on video HERE.
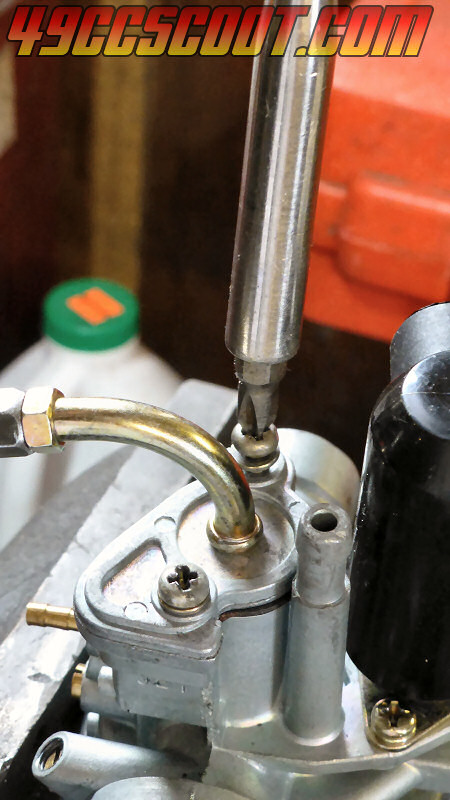
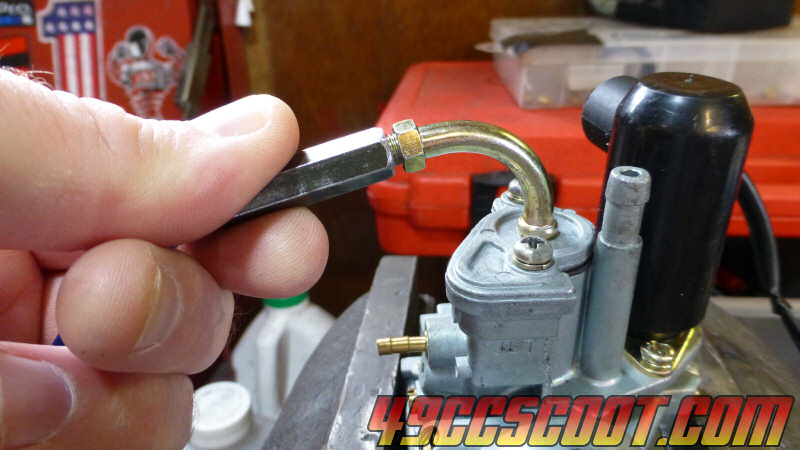
Minarelli / 1E40QMB Slide Carburetor Needle Changes
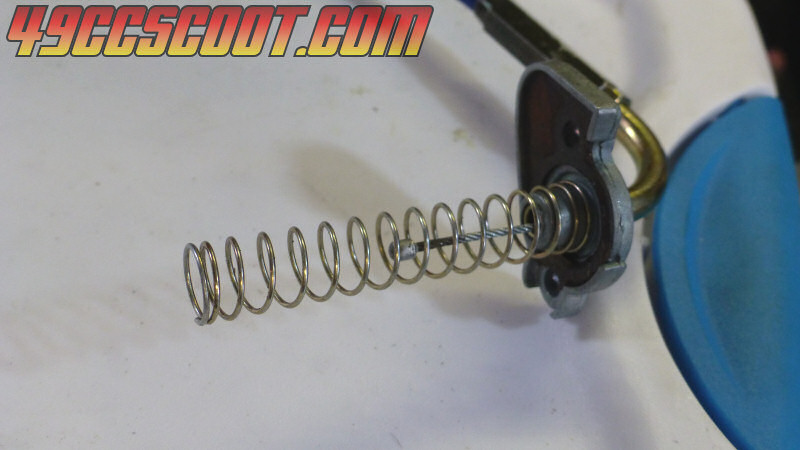
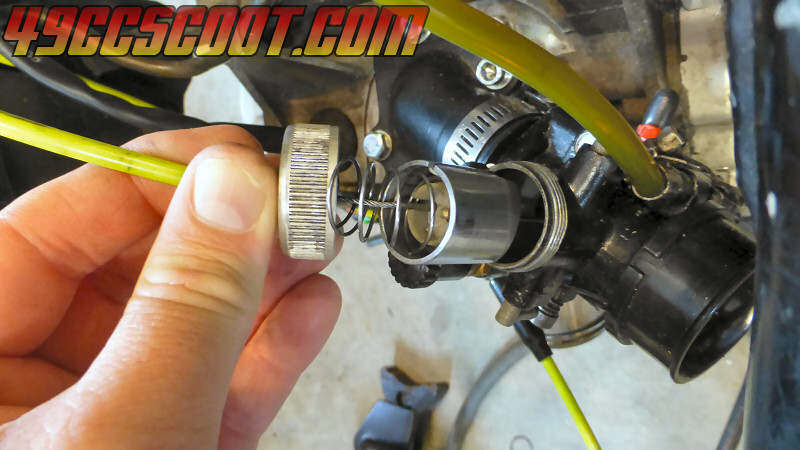
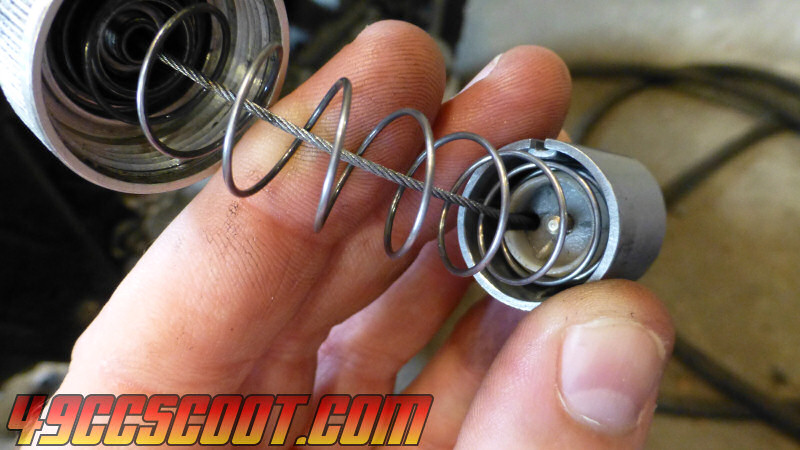
Remove the screw or screws holding the carburetor's cap in place. Then the cable and slide assembly should slide up and out of the carburetor.
 |
 |
Adjust the cable to create more slack and make the rest of the needle work easier. The cable usually threads onto the tube coming out of the carburetors cap. Screwing that on all the way should give you enough slack. You will need to loose the locking nut from against the cable, screw the nut all the way on, and then screw the cable on farther. There are also adjusters at the throttle on the handlebars and sometimes inline in the cable if more slack is necessary.
 |
 |
 |
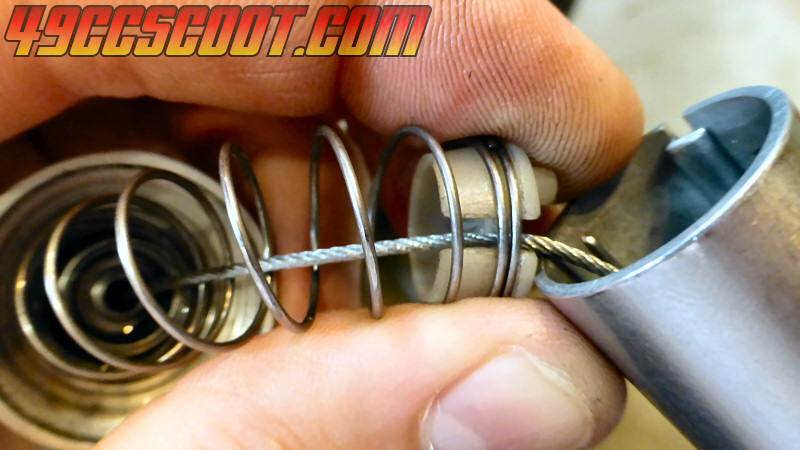
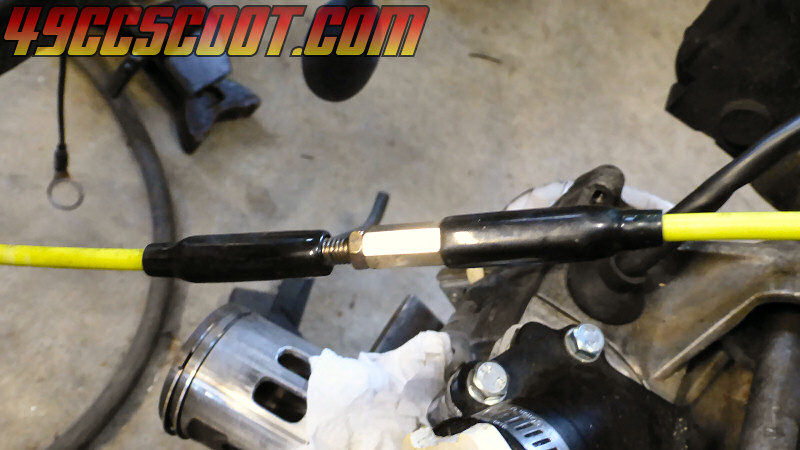 |
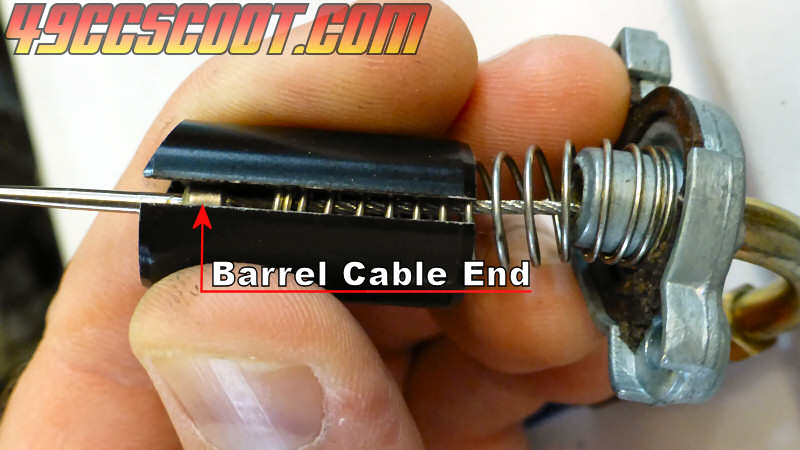
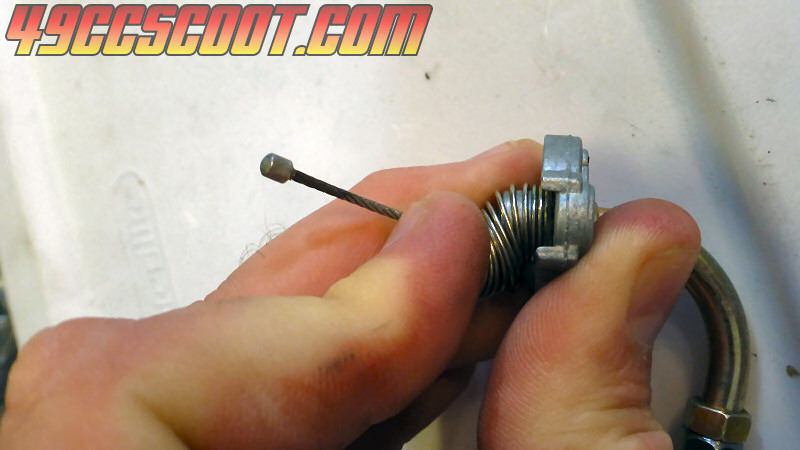
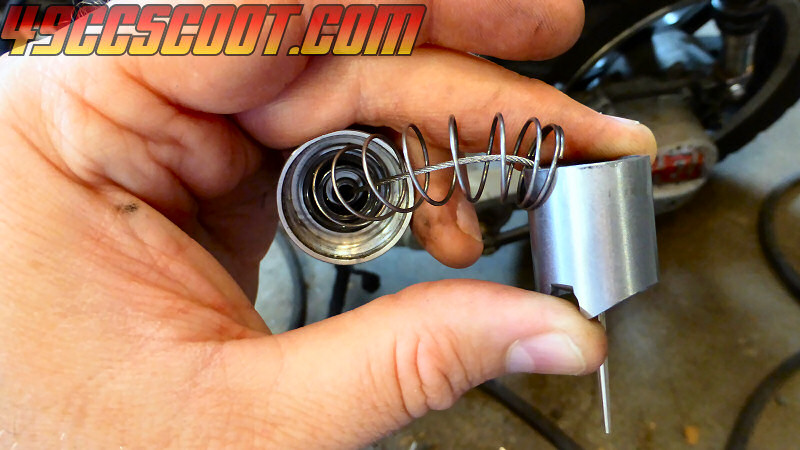
Push the slide so that it sits closer to the cap and compresses the spring. The barrel cable end should protrude out of the slide.
 |
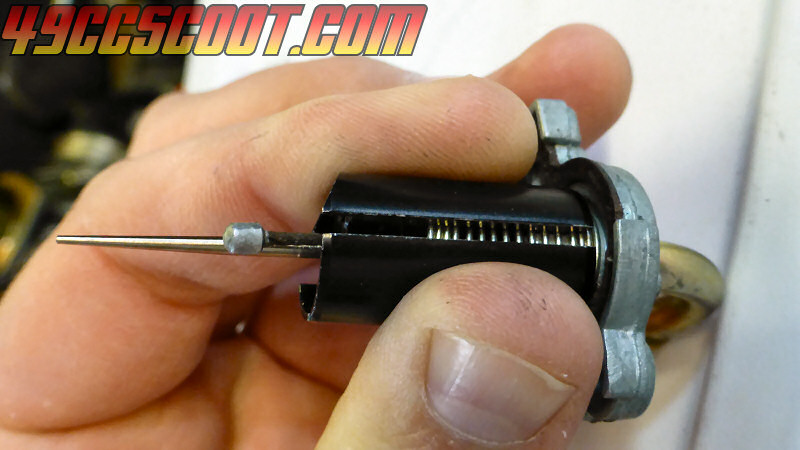 |
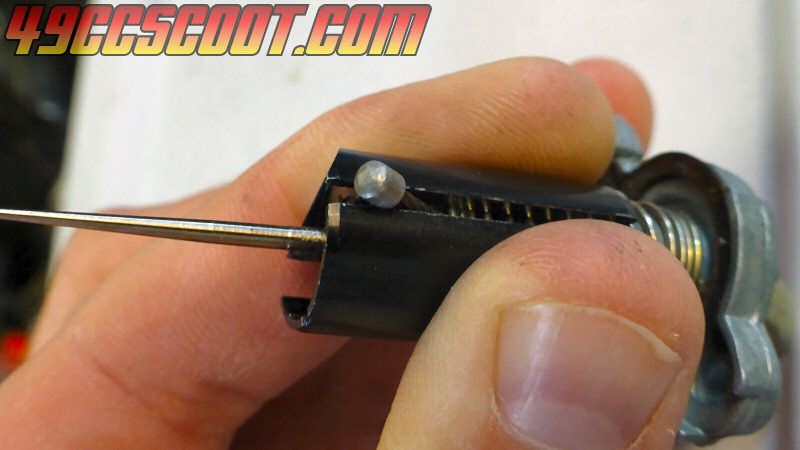
Push the cable to the side, through the open section of the slide. Then gently pull the slide off of the cable.
 |
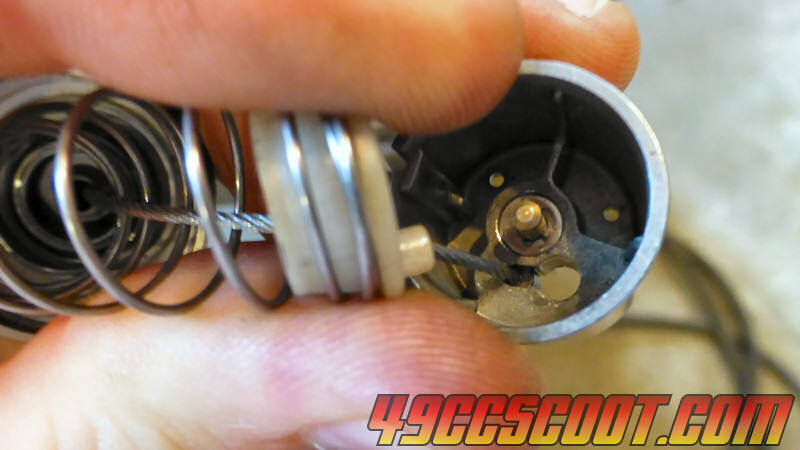
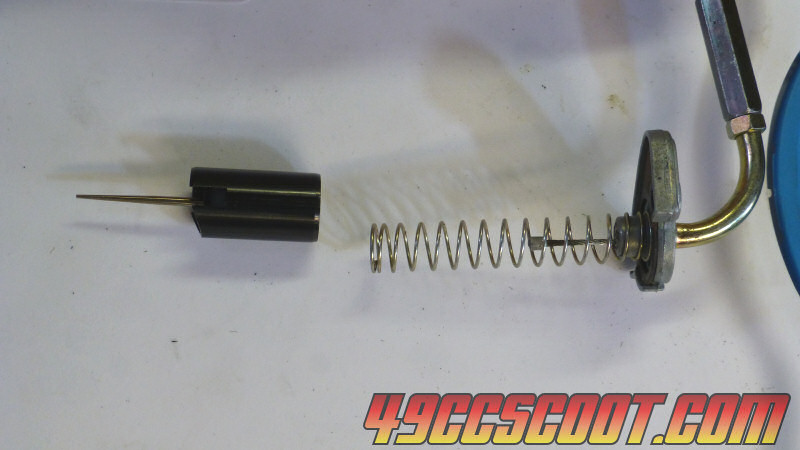 |
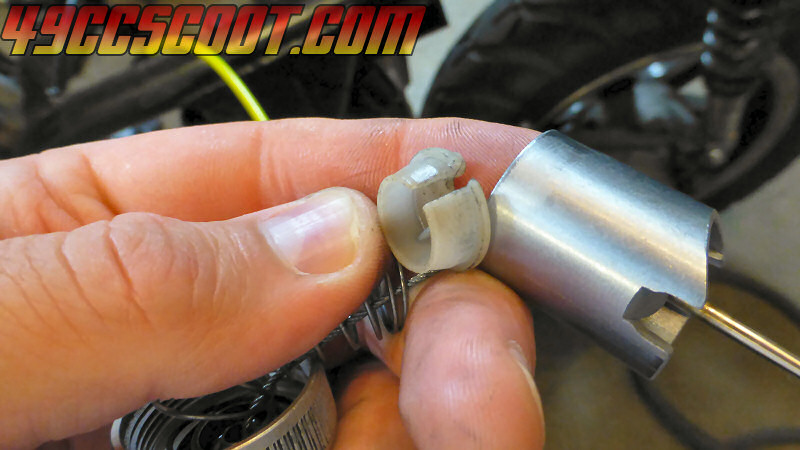
Look inside of the slide. You should see a clip above the needle that keeps the needle in place. Use a small pair of needle nose pliers to squeeze the center of the clip as shown below. Only use enough force that the clip can move. Hold pressure on the clip and pull it up and out of the slide.
 |
 |
 |
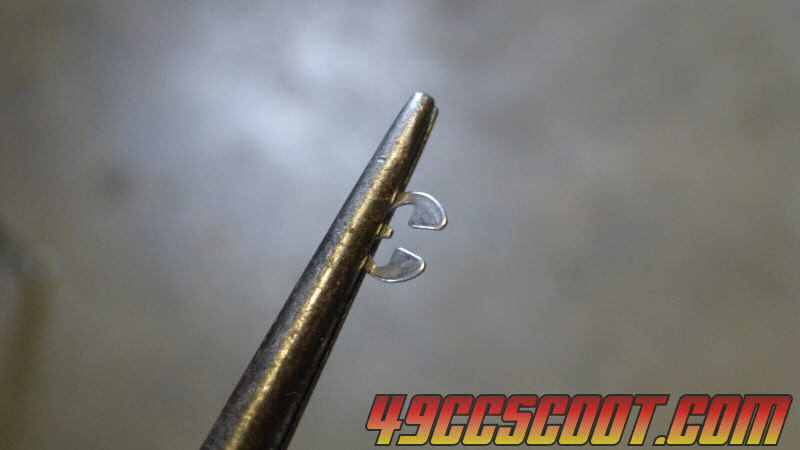
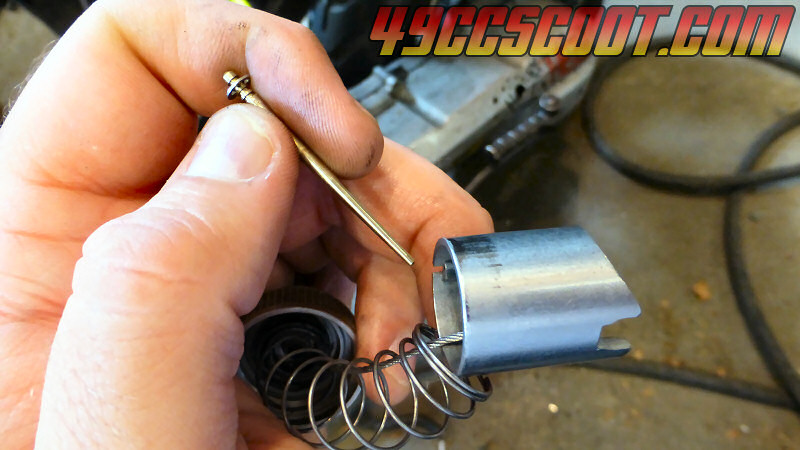
Use a small pair of needle nose pliers to grab the clip as shown below. Then pull the needle out, toward the opening in the clip to remove it. You may even be able to do this without tools. Whatever method you choose, always be careful not to bend the clip.
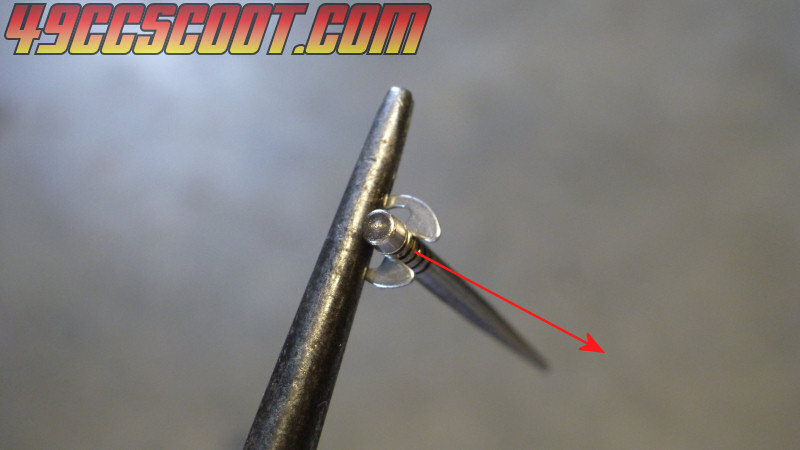 |
If you are changing needle clip position, keep the clip in the pliers or hold it tightly however you did before. Then line up the clip with the groove on the needle that you want to switch to and push the needle into the opening of the clip. Make sure the needle and clip are totally seated and that the clip is not loose. If the clip is loose, squeezing the open ends together gently may fix it. Otherwise, replace the clip. Sometimes hardware stores carry tiny e-clips that fit, just be sure to take the needle along with you to help you find what you need.
 |
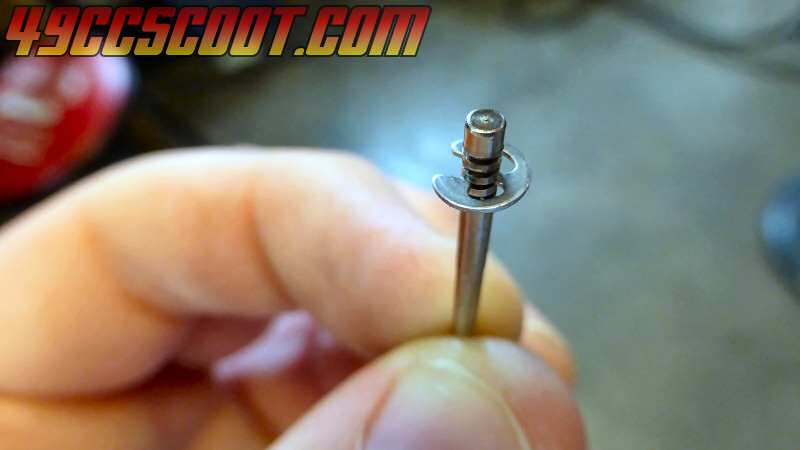 |
If you are swapping the whole needle, remove the clip and then reinstall it onto the new needle.
Insert the needle through the hole in the center of the slide.
 |
 |
Install the retainer clip above the needle by squeezing it and placing it into the slide. Push it all the way down. The retainer must be installed so that it leaves the open side of the slide clear and the throttle cable can pass through.
 |
 |
 |
If the spring came off of the carburetor top, reinstall it over the center section. Compress the spring so that the cable sticks out. You may notice me using forceps for the pictures. This is not necessary. I did it because it's difficult to take pictures while doing some of the steps below with one hand occupied holding the spring.
 |
 |
 |
Position the cable end into it's hole at the end of the slide. Then tilt the slide and get the cable to go all the way through the opening in the side. Then you can release the spring and let it seat in the slide. Check the assembly over and be sure everything is secure before moving on.
 |
 |
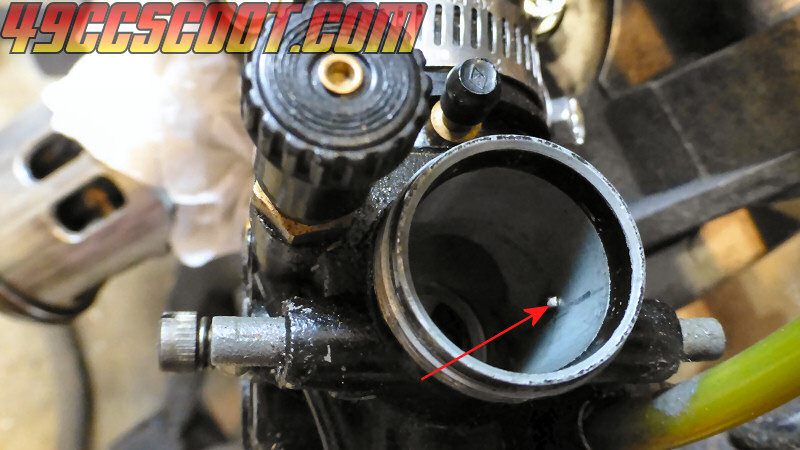
Now the slide is ready to go back into the carburetor. You should notice a couple of nubs in the side of the bore where the slide goes. The open section of the slide needs to align with the nubs. Otherwise the slide will not go all the way in. Be careful not to force the slide. If it won't go in and the groove and nubs are aligned, make sure the needle is going into the nozzle and not hitting the base of the throttle bore.
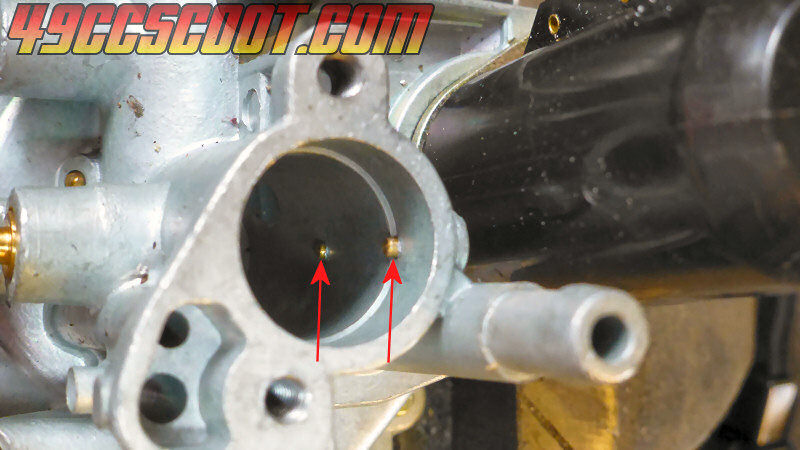 |
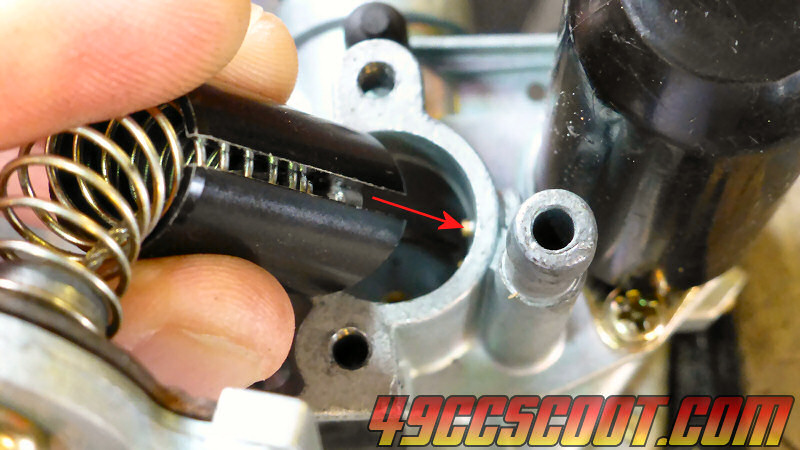 |
Secure the carb top with the screws you removed earlier. Then you'll need to take the slack out of the cable. Adjust the cable so that there's only a small amount of play before the throttle opens and then tighten the adjusters and lock nuts.
 |
 |
You can see this process on video HERE.
DellOrto PHBG Carburetor Needle Changes
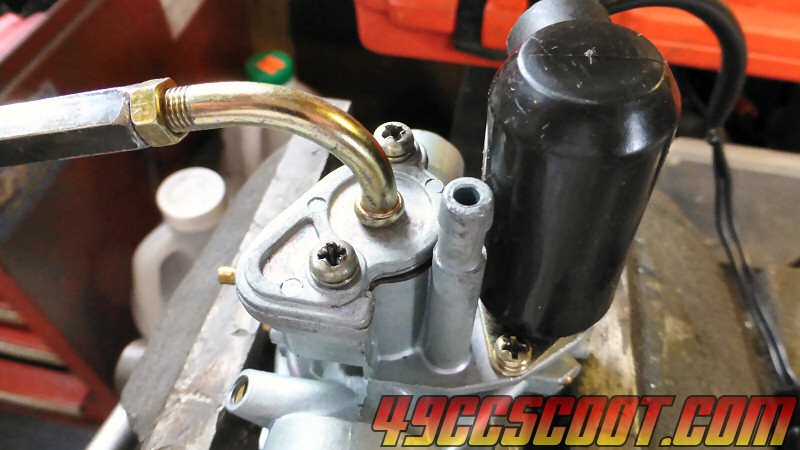
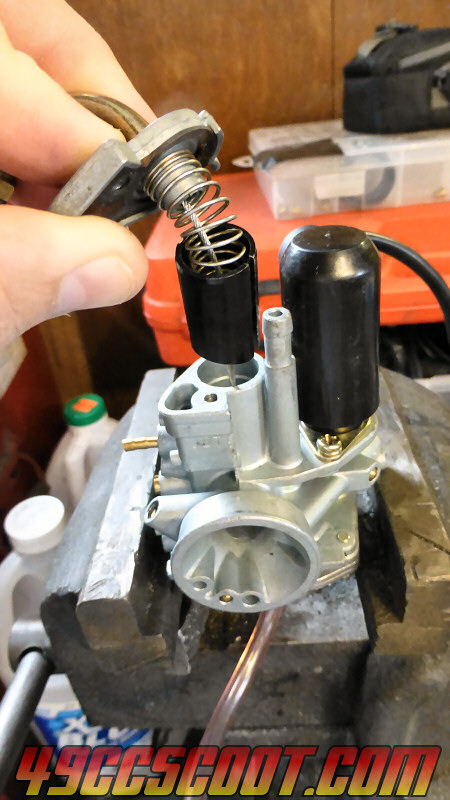
Begin by removing the carburetor's cap. Some models have a screw on/off cap and others have a bolt-on cap with two screws that need to be removed. Pull the slide assembly up and out of the carb. Be careful not to misplace the gasket or o-ring under the cap.
 |
 |
 |
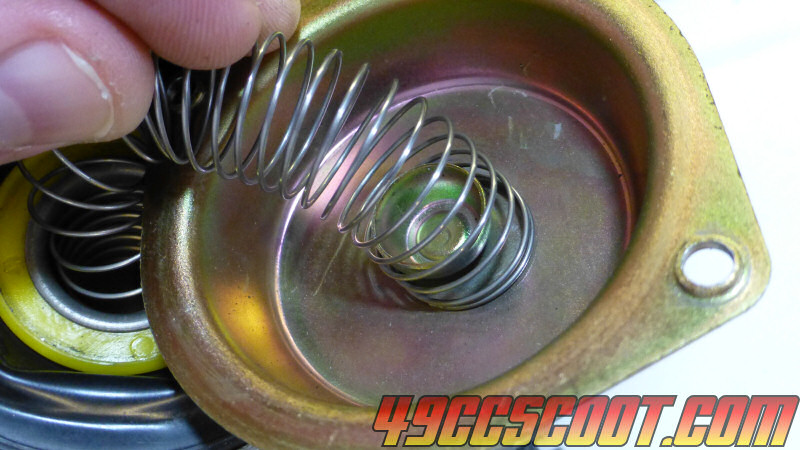
Bunch the spring up toward the cap and remove the plastic needle plate and needle. Once the spring is compressed, both should fall out.
 |
 |
 |
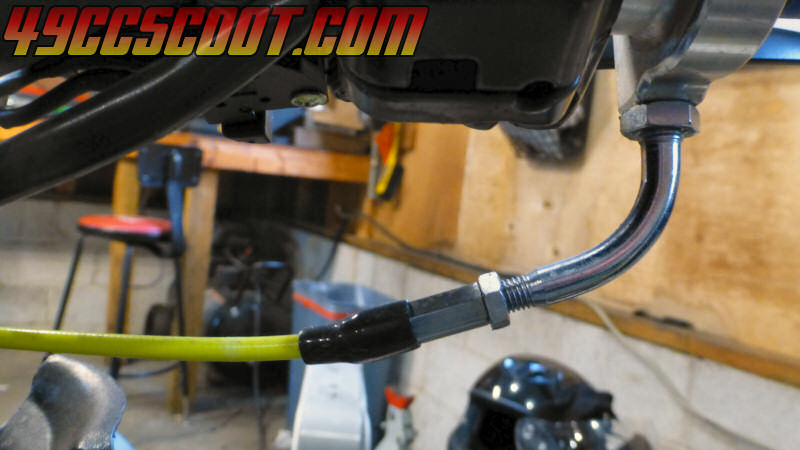
If you have trouble getting the needle plate and needle you may be able to make it easier by adjusting the cable to add slack. There is usually an adjuster at the throttle on the handlebars. Sometimes there is adjustment entering the carb or inline in the cable.
|
|
Use a small pair of needle nose pliers to grab the needle clip as shown below. Then pull the needle out, toward the opening in the clip to remove it. You may even be able to do this without tools. Whatever method you choose, always be careful not to bend the clip.
 |
If you are changing needle clip position, keep the clip in the pliers or hold it tightly however you did before. Then line up the clip with the groove on the needle that you want to switch to and push the needle into the opening of the clip. Make sure the needle and clip are totally seated and that the clip is not loose. If the clip is loose, squeezing the open ends together gently may fix it. Otherwise, replace the clip. Sometimes hardware stores carry tiny e-clips that fit, just be sure to take the needle along with you to help you find what you need.
 |
 |
If you are swapping the whole needle, remove the clip and then reinstall it onto the new needle.
Place the needle back into the hole in the center of the slide.
 |
 |
Notice that on the plastic needle plate there is an cutout on one side. Also notice that the flat side, the bottom, has a nub.
 |
 |
Bunch up the spring a bit and position the throttle cable into the cutout in the side of the needle plate. Then let the spring meet up with the needle plate. Let the spring and plate fall all the way into the slide, making sure the nub on the needle plate aligns with the large hole in the slide.
 |
 |
 |
 |
Make sure the assembly is secure. You can look at the bottom of the slide to verify that the needle plate's nub is seated in the hole next to the throttle cable's hole.
 |
Align the groove in the slide with the nub inside of the carburetor and gently push the slide assembly into the carb. If it won't go in and the groove and nub are aligned, make sure the needle is going into the nozzle and not hitting the base of the throttle bore. Then secure the carburetor's cap.
 |
 |
 |
If you adjusted slack into the throttle cable earlier, adjust the cable so that there's only a small amount of play before the throttle opens and then tighten the adjusters and lock nuts.
What If The Jet Needle Only Has One Clip Position?
While most needles have 3-5 grooves that allow the needle clip to be moved for tuning purposes, some only have 1 groove. This is most often the case on more recently manufactured scooters trying to conform with EPA (Environmental Protection Agency) regulations. The inability to easily move the clip makes it more difficult to adjust the needle height and alter the factory settings for air/fuel mixture. Non-adjustable needle designs are generally found in "sealed" carburetors. Sealed carbs feature a plug or cap to prevent idle mixture adjustment and usually have tamper proof screws in the bowl to make it difficult to access the jets. If you have one of these carburetors, consider buying a replacement carb that is not sealed. Carbs for common scooters are often able to be purchased for $20-40 online.
If you would like to work with a sealed carb, CLICK HERE for more information about them and how to deal with them.
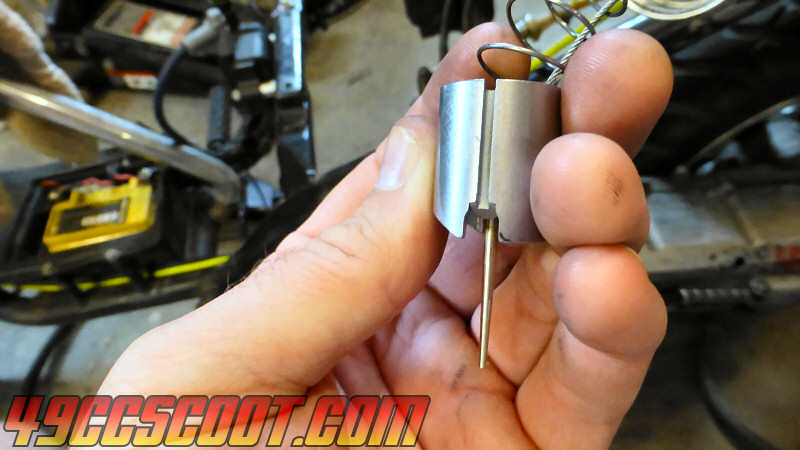
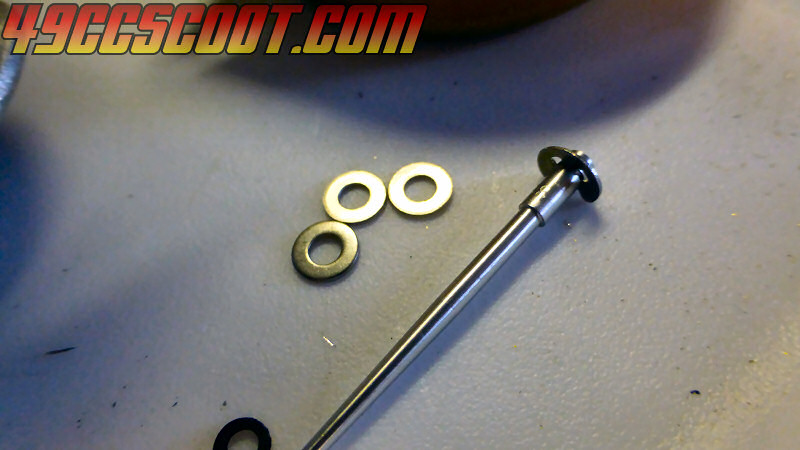
The needle can still be raised to richen the mixture by using washers under the needle clip. Take your needle to a hardware store that carries a large selection of fasteners. You'll need a washer that slides over the needle easily, but is not loose. The washer should also be roughly the same outside diameter as the clip or slightly smaller to be certain it will fit into any recess intended for the clip. Limit yourself to using 1 or 2 washers. You can't lower the needle to lean the mixture unless you have room above the current groove to make a new groove, and the patience and tools to do it properly.
 |
 |
 |
Mid-Throttle Tuning
There are multiple ways that people use to tune the 1/4 to 3/4 throttle settings. Some prefer doing spark plug checks to see if the plug is showing signs of rich or lean after riding or operating on the stand at various throttle positions. Some remove the main jet and check part throttle activity, looking for symptoms of rich and lean from around 1/4 to 3/4 throttle to help them select a needle. I'm sure there are many ideas out there that probably work. Much like main jet tuning, I stick with a somewhat simple trial and error approach to mid-throttle tuning.
The safest way to begin is to set the needle clip in the richest position, which will be the groove nearest the bottom of the needle that raises it the highest out of the atomizer. Let the scooter run on the center stand, and be certain that it is secure and the wheel is not touching or near touching the ground. Slowly transition the throttle throughout the 1/4 to 3/4 throttle range. Pay close attention to the sound and feel of the engine and the throttle response. If you get a lot of sputtering and struggling to increase RPM, often accompanied by a dull or flat tone, you should try a leaner needle setting by moving the clip up one spot. For two-strokes, a bit of sputtering is acceptable. Four-strokes should not sputter. If the engine bogs, usually with a "buwahhh" sound, or RPM hangs (drops very slowly after throttle is released) your needle may be too lean if you started out in the richest clip setting. In this case the needle should be replaced with a richer/thinner needle. If you aren't in the richest needle position and experience bogging or hanging, move the clip down a notch. If the engine responds well and RPM doesn't hang, you're ready to move on to road testing. Continue this process until you find a needle and clip setting that allows the engine to operate without bogging or hesitation.
Next, take the scooter out to a safe test spot where you can operate at various speeds without impeding traffic or putting yourself or others in danger. Ride the scooter and use the throttle throughout the 1/4 to 3/4 throttle range. Try rolling on the throttle as well as holding the throttle briefly in different positions. Again pay attention to engine operation and note symptoms of rich and lean conditions as previously described. Try some quick throttle actions as well to check responsiveness. Take notes and experiment with different needle positions (or needles if clip settings can't cure the issues). Find the mid-throttle settings that provide the best throttle response and feel throughout the 1/4 to 3/4 throttle range. In four-stroke applications, you should hear no sputtering when the throttle is held in any position. Choose the richest needle or clip position that provides good results. When tuning a two-stroke, I like to hear a bit of sputtering throughout throttle positions. This ensures a safer rich tune, which is a good idea because two-strokes are more prone to engine seizures or even melting piston crowns if the mixture is lean or if the engine is running too hot and the additional fuel helps to cool the engine. A slightly rich setting may save your cylinder kit or more one day.
Idle Adjustment... Again
You're almost done, but before you call it quits the idle should be adjusted once more. Follow the same procedure that was shown earlier to dial in the idle mixture and speed settings.
Once you have set the idle so the scooter is running smoothly and at an appropriate speed, apply a small amount of throttle briefly and release it. If engine RPM hangs, you should adjust the mixture screw to richen the mixture until RPM no longer hangs. If RPM drops below idle when you let off of the throttle or as the engine idles for a while, try leaning the mixture setting slightly.
Rev the engine quickly and make sure it is responsive. If it bogs when revving from idle, see if a mixture setting change can improve the condition. If you cannot correct the symptoms you may have to go back over the tune. Here are a couple of carburetor tuning manuals that you may find useful.
DellOrto Carburetor Info & Tuning Manual
Mikuni VM Carburetor Tuning Manual
Wrapping Up
Even after you've tuned the carburetor with the jetting and settings as described here, pay attention to your engine when you begin riding the scooter normally. Sometimes symptoms will occur during long periods of riding that you may not experience while executing brief tuning procedures. If you begin to experience any of the symptoms of rich or lean conditions, take a note of the throttle position where they occur and go over the tune to correct them ASAP.
Carburetor Tuning Worksheet
I created this carburetor tuning worksheet that can be printed out to help you stay on track during the tuning process. Check items off as you go, record your main jet tuning info, refer back to this article if needed, and you should be able to have your scooter in tune once the list is complete.
49ccScoot.Com's Carburetor Tuning Worksheet
Carburetor Cleaning
2T Carburetor Settings & Adjustment Videos : 1, 2, 3, 4
Float Info
Jet Measurements
Idle Mixture Adjustment
Unsealing Carburetors
Jet Drilling Information
<< Back to the Scoot F.A.Q.